In the world of web applications, user authentication is a critical component. However, with the proliferation of login options like social media accounts and magic links, users often forget which method they used to sign up. This can lead to frustration and potential account duplication. In this post, we’ll explore an innovative solution to this problem by creating a smart login component that remembers the user’s last used authentication method using local storage.
This post builds upon our previous article on Authentication in Next.js 14 with NextAuth.js. If you’re new to NextAuth.js or need a refresher on basic setup and configuration, we recommend starting there.
This solution leverages localStorage, a powerful web API that allows web applications to store key-value pairs locally within a user’s browser.
The idea is simple yet powerful: when a user successfully logs in, we store their authentication method (e.g., Google, Twitter, magic link) and email (if applicable) in the browser’s local storage. The next time they visit the login page, we prioritize displaying the last used method, making it easier for them to log in quickly.
Overview of Local Storage:
Capabilities:
- Persistent storage across browser sessions
- Typically allows at least 5MB of data storage per domain
- Simple key-value storage with a synchronous API
Limitations:
- Limited to string storage (requires serialization for complex data)
- Bound by same-origin policy
- No built-in expiration mechanism
- Not secure for sensitive data (stored in plaintext)
Despite these limitations, localStorage is ideal for our use case of remembering user preferences, as it doesn’t involve sensitive data and significantly enhances user experience.
Implementing Smart Login:
Let’s build this component using Next.js and NextAuth.js. We’ll create a custom login component that interacts with local storage to remember and display the user’s preferred login method.
Step 1: Setting up the project
First, ensure you have a Next.js project set up with NextAuth.js configured. If not, you can create one using the following commands:
npx create-next-app@latest my-smart-login-app
cd my-smart-login-app
npm install next-auth
If you need detailed instructions on setting up NextAuth.js in your Next.js project, refer to our comprehensive guide: Authentication in Next.js 14 with NextAuth.js.
Step 2: Creating the smart login component
Create a new file called SmartLogin.js in your components folder:
import { useState, useEffect } from 'react';
import { signIn } from 'next-auth/react';

const SmartLogin = () => {
  const [lastUsedMethod, setLastUsedMethod] = useState(null);
  const [email, setEmail] = useState('');

  useEffect(() => {
    // Retrieve last used method and email from local storage
    const storedMethod = localStorage.getItem('lastUsedAuthMethod');
    const storedEmail = localStorage.getItem('lastUsedEmail');

    if (storedMethod) setLastUsedMethod(storedMethod);
    if (storedEmail) setEmail(storedEmail);
  }, []);

  const handleLogin = async (method) => {
    let result;

    switch (method) {
      case 'google':
        result = await signIn('google');
        break;
      case 'twitter':
        result = await signIn('twitter');
        break;
      case 'magic-link':
        result = await signIn('email', { email });
        break;
      default:
        console.error('Unknown login method');
        return;
    }

    if (result?.error) {
      console.error('Login failed:', result.error);
    } else {
      // Store the successful login method and email (if applicable)
      localStorage.setItem('lastUsedAuthMethod', method);
      if (method === 'magic-link') {
        localStorage.setItem('lastUsedEmail', email);
      }
    }
  };

  return (
    <div>
      <h2>Login</h2>
      {lastUsedMethod && (
        <p>Last used method: {lastUsedMethod}</p>
      )}
      <button onClick={() => handleLogin('google')}>
        {lastUsedMethod === 'google' ? '★ ' : ''}Login with Google
      </button>
      <button onClick={() => handleLogin('twitter')}>
        {lastUsedMethod === 'twitter' ? '★ ' : ''}Login with Twitter
      </button>
      <div>
        <input
          type="email"
          value={email}
          onChange={(e) => setEmail(e.target.value)}
          placeholder="Email for magic link"
        />
        <button onClick={() => handleLogin('magic-link')}>
          {lastUsedMethod === 'magic-link' ? '★ ' : ''}Send Magic Link
        </button>
      </div>
    </div>
  );
};

export default SmartLogin;
Step 3: Integrating the component
Now, you can use this SmartLogin component in your login page. Create or modify pages/login.js:
import SmartLogin from '../components/SmartLogin';

const LoginPage = () => {
  return (
    <div>
      <h1>Welcome Back!</h1>
      <SmartLogin />
    </div>
  );
};

export default LoginPage;
How it works:
- When the component mounts, it checks local storage for the last used authentication method and email.
- If found, it sets the state accordingly, which affects how the login options are displayed (starred items are last used).
- When a user successfully logs in, the method (and email for magic links) is stored in local storage.
- On subsequent visits, the last used method is highlighted and the email field is pre-filled if applicable.
Considerations and Limitations:
- Device-specific: This approach is tied to the specific device and browser used, as it relies on local storage.
- Privacy: Ensure users are aware that their login preference is being stored locally.
- Security: Be cautious about storing sensitive information in local storage. In this case, we’re only storing the method and email, not passwords or tokens.
- User choice: Always provide clear options for users to choose a different login method if desired.
Styling with Tailwind CSS and DaisyUI
To make our smart login component visually appealing, let’s style it using Tailwind CSS and DaisyUI. First, we need to install and configure these in our Next.js project.
Step 1: Install Tailwind CSS and DaisyUI
Run the following commands in your project directory:
npm install -D tailwindcss postcss autoprefixer daisyui@latest
npx tailwindcss init -p
Step 2: Configure Tailwind CSS
Update your tailwind.config.js file:
module.exports = {
  content: [
    "./pages/**/*.{js,ts,jsx,tsx}",
    "./components/**/*.{js,ts,jsx,tsx}",
  ],
  theme: {
    extend: {},
  },
  plugins: [require("daisyui")],
}
Step 3: Add Tailwind directives to your CSS
Create or update your ./styles/globals.css file:
@tailwind base;
@tailwind components;
@tailwind utilities;
Step 4: Import the CSS file
In your pages/_app.js file, import the CSS:
import '../styles/globals.css'

function MyApp({ Component, pageProps }) {
  return <Component {...pageProps} />
}

export default MyApp
Step 5: Update the SmartLogin component
Now, let’s update our SmartLogin.js component with Tailwind CSS and DaisyUI classes:
import { useState, useEffect } from 'react';
import { signIn } from 'next-auth/react';
const SmartLogin = () => {
const [lastUsedMethod, setLastUsedMethod] = useState(null);
const [email, setEmail] = useState('');
useEffect(() => {
// Retrieve last used method and email from local storage
const storedMethod = localStorage.getItem('lastUsedAuthMethod');
const storedEmail = localStorage.getItem('lastUsedEmail');
if (storedMethod) setLastUsedMethod(storedMethod);
if (storedEmail) setEmail(storedEmail);
}, []);
const handleLogin = async (method) => {
let result;
switch (method) {
case 'google':
result = await signIn('google');
break;
case 'twitter':
result = await signIn('twitter');
break;
case 'magic-link':
result = await signIn('email', { email });
break;
default:
console.error('Unknown login method');
return;
}
if (result?.error) {
console.error('Login failed:', result.error);
} else {
// Store the successful login method and email (if applicable)
localStorage.setItem('lastUsedAuthMethod', method);
if (method === 'magic-link') {
localStorage.setItem('lastUsedEmail', email);
}
}
};
return (
<div className="card w-96 bg-base-100 shadow-xl">
<div className="card-body">
<h2 className="card-title text-2xl mb-4">Login</h2>
{lastUsedMethod && (
<p className="text-sm text-gray-600 mb-4">Last used method: {lastUsedMethod}</p>
)}
<div className="flex flex-col gap-3">
<button
className={`btn ${lastUsedMethod === 'google' ? 'btn-primary' : 'btn-outline btn-primary'}`}
onClick={() => handleLogin('google')}
>
{lastUsedMethod === 'google' ? '★ ' : ''}Login with Google
</button>
<button
className={`btn ${lastUsedMethod === 'twitter' ? 'btn-secondary' : 'btn-outline btn-secondary'}`}
onClick={() => handleLogin('twitter')}
>
{lastUsedMethod === 'twitter' ? '★ ' : ''}Login with Twitter
</button>
<div className="form-control w-full">
<label className="label">
<span className="label-text">Email for magic link</span>
</label>
<div className="flex gap-2">
<input
type="email"
value={email}
onChange={(e) => setEmail(e.target.value)}
placeholder="your@email.com"
className="input input-bordered flex-grow"
/>
<button
className={`btn ${lastUsedMethod === 'magic-link' ? 'btn-accent' : 'btn-outline btn-accent'}`}
onClick={() => handleLogin('magic-link')}
>
{lastUsedMethod === 'magic-link' ? '★ ' : ''}Send
</button>
</div>
</div>
</div>
</div>
</div>
);
};
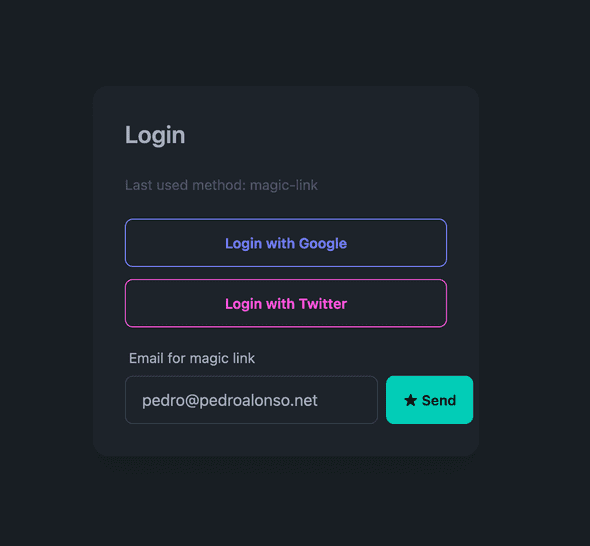
export default SmartLogin;This styled version uses DaisyUI’s card component and various utility classes from Tailwind CSS to create a visually appealing login form. The last used method is highlighted with a primary button style, making it stand out to the user.
Here’s how the smart login component looks with the last used method highlighted:
Conclusion:
By implementing this smart login component, we’ve significantly improved the user experience for returning users. They no longer need to remember which authentication method they used previously, reducing friction and potential frustration.
While this approach has some limitations, the benefits in terms of user experience are substantial.
Remember to thoroughly test this implementation across different scenarios and devices to ensure a smooth experience for all users.