Welcome to our three-part series on implementing WebSockets with Next.js! In this series, we’ll explore how to create real-time, interactive web applications using WebSocket technology. Whether you’re building a chat app, a live dashboard, or any application requiring instant updates, this series will equip you with the knowledge and skills to leverage the power of WebSockets in your Next.js projects.
In this first part, we’ll cover the basics of WebSockets, set up our development environment, and create a simple real-time chat application. By the end of this tutorial, you’ll have a solid foundation in WebSocket implementation with Next.js, setting the stage for more advanced features in the upcoming parts.
Table of Contents
1. Introduction to WebSockets
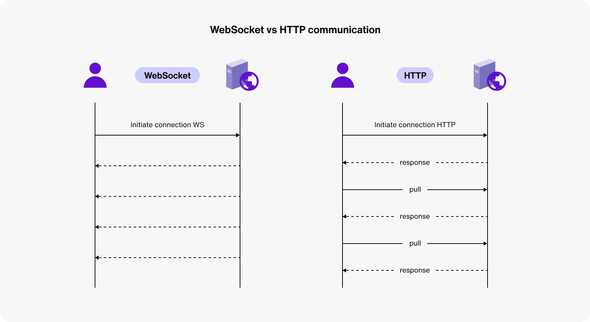
WebSockets are a powerful technology that enables real-time, bidirectional communication between web browsers and servers. Unlike traditional HTTP requests, WebSockets maintain a persistent connection, allowing instant data exchange without the need for constant polling.
Imagine WebSockets as a phone call between your browser and the server, where both parties can speak and listen simultaneously. This contrasts with the traditional request-response model, which is more like sending letters back and forth.
Some key things to know about WebSockets:
- Persistent connections.
- Low latency communication.
- Bidirectional data flow.
- Ideal for real-time applications.
1.1 Real-World WebSocket Use Cases
WebSockets have revolutionized various web applications. Here are some compelling use cases:
- Chat Applications: Instant message delivery without page refreshes.
- Live Sports Updates: Real-time stats and scores as they happen.
- Collaborative Tools: Simultaneous document editing (e.g., Google Docs).
- Multiplayer Games: Instant updates of player actions and game states.
- Financial Trading Platforms: Real-time stock prices and trade executions.
- IoT Device Communication: Instant control of smart home devices.
- Live Auctions: Real-time bid updates for all participants.
- Real-time Analytics Dashboards: Instant data updates for business metrics.
In all these scenarios, WebSockets provide a smoother, more responsive user experience compared to traditional HTTP methods.
1.2 WebSockets vs. HTTP: Understanding the differences
| Feature | WebSockets | HTTP |
|---|---|---|
| Connection | Persistent | Stateless |
| Communication | Bidirectional | Unidirectional (request-response) |
| Overhead | Low after initial handshake | Higher due to headers in each request |
| Real-time capability | Native | Requires polling or long-polling |
| Use cases | Real-time apps, live updates | Traditional web applications |
2. Setting Up the Development Environment
Let’s set up a Next.js project with WebSocket support using Socket.IO.
2.1 Understanding Socket.IO
Socket.IO is a popular library for implementing WebSockets. It offers several advantages:
- Fallback Support: Automatically falls back to other methods if WebSockets are unavailable.
- Easy-to-Use API: Simplifies sending and receiving messages.
- Reliability: Includes features like automatic reconnection and packet buffering.
- Room and Namespace Support: Facilitates complex communication patterns.
- Scalability: Designed for distributed environments.
- Cross-Browser Compatibility: Works consistently across different browsers.
- Next.js Integration: Well-established patterns for use with Next.js.
2.2 Creating a new Next.js project
First, let’s create a new Next.js project:
npx create-next-app@latest websocket-tutorial
cd websocket-tutorial
Choose these options when prompted:
- Use TypeScript: Yes
- Use ESLint: Yes
- Use Tailwind CSS: Yes
- Use
src/directory: Yes - Use App Router: Yes
- Customize default import alias: No
2.3 Installing necessary dependencies (Socket.IO)
Install Socket.IO and its client-side library:
cd websocket-tutorial
npm install socket.io socket.io-client
2.4 Configuring Next.js for WebSocket support
Next.js doesn’t natively support WebSockets out of the box. This is because Next.js is primarily designed for server-side rendering and API routes, which typically use HTTP. WebSockets require a persistent connection, which is different from the request-response model that Next.js is optimized for by default.
To add WebSocket support, we need to create a custom server that can handle both HTTP requests (for Next.js pages and API routes) and WebSocket connections. This custom server will run alongside our Next.js application, allowing us to use all the features of Next.js while also supporting real-time WebSocket communication.
Create a custom server by adding a server.js file in your project root:
const { createServer } = require('http');
const { parse } = require('url');
const next = require('next');
const { Server } = require("socket.io");

const dev = process.env.NODE_ENV !== 'production';
const app = next({ dev });
const handle = app.getRequestHandler();

app.prepare().then(() => {
  const server = createServer((req, res) => {
    const parsedUrl = parse(req.url, true);
    handle(req, res, parsedUrl);
  });

  const io = new Server(server);

  io.on('connection', (socket) => {
    console.log('A client connected');

    socket.on('disconnect', () => {
      console.log('A client disconnected');
    });
  });

  server.listen(3000, (err) => {
    if (err) throw err;
    console.log('> Ready on http://localhost:3000');
  });
});
Update your package.json to use this custom server:
"scripts": {
  "dev": "node server.js",
  "build": "next build",
  "start": "NODE_ENV=production node server.js"
}
Let’s break down what this code does:
- We create an HTTP server using Node.js’s http module.
- We initialize a Next.js app and get its request handler.
- We create a Socket.IO server and attach it to our HTTP server.
- We set up a basic connection handler for Socket.IO that logs when clients connect and disconnect.
- Finally, we start the server listening on port 3000.
This setup allows our Next.js application to handle regular HTTP requests for pages and API routes, while also supporting WebSocket connections through Socket.IO.
2.5 Verifying the setup
To make sure everything is set up correctly, let’s add a simple test:
Create or modify src/app/page.tsx with the following content:
'use client';

import { useEffect } from 'react';
import io from 'socket.io-client';

export default function Home() {
  useEffect(() => {
    const socket = io();

    socket.on('connect', () => {
      console.log('Connected to server');
    });

    return () => {
      socket.disconnect();
    };
  }, []);

  return (
    <main className="flex min-h-screen flex-col items-center justify-between p-24">
      <h1 className="text-4xl font-bold">WebSocket Test</h1>
    </main>
  );
}
Run your development server:
npm run devVisit http://localhost:3000 and check the browser console for the “Connected to server” message. Also, in your terminal where the server is running, you should see a message saying “A client connected” when you load the page.
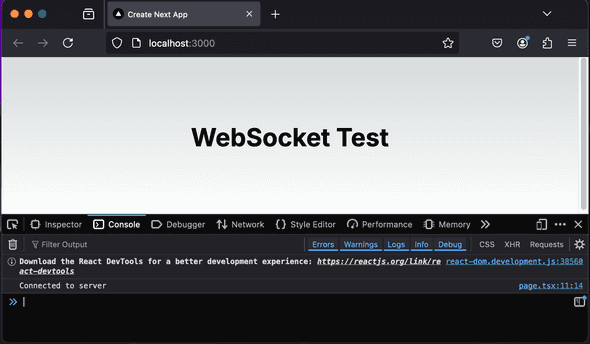
If you see these messages, congratulations! You’ve successfully set up WebSockets with your Next.js application.
Remember, this is just a basic setup. In a real application, you’d add more complex logic to handle various WebSocket events and messages. But this gives you a solid foundation to build upon.
Next, we’ll dive into implementing some basic bi-directional communication between the client and server using our WebSocket connection.
3. Implementing Basic Real-Time Broadcasting with WebSockets
Now, let’s create a simple broadcast application to demonstrate WebSocket communication.
3.1 Enhancing the WebSocket Server
First, let’s update our server to handle chat messages. Open your server.js file and update the WebSocket logic:
// ... previous code

io.on('connection', (socket) => {
  console.log('A client connected');

  socket.on('chat message', (msg) => {
    console.log('Message received:', msg);
    io.emit('chat message', msg); // Broadcast the message to all connected clients
  });

  socket.on('disconnect', () => {
    console.log('A client disconnected');
  });
});

// ... rest of the code
This code listens for ‘chat message’ events from clients and broadcasts them to all connected clients.
3.2 Creating a Custom Hook for WebSocket Communication
Now, let’s create a react hook useSocket to handle chat functionality. Create src/hooks/useSocket.ts:
import { useEffect, useState } from 'react';
import io, { Socket } from 'socket.io-client';

export const useSocket = () => {
  const [socket, setSocket] = useState<Socket | null>(null);
  const [isConnected, setIsConnected] = useState(false);
  const [messages, setMessages] = useState<string[]>([]);

  useEffect(() => {
    const socketIo = io();

    socketIo.on('connect', () => {
      setIsConnected(true);
    });

    socketIo.on('disconnect', () => {
      setIsConnected(false);
    });

    socketIo.on('chat message', (msg: string) => {
      setMessages((prevMessages) => [...prevMessages, msg]);
    });

    setSocket(socketIo);

    return () => {
      socketIo.disconnect();
    };
  }, []);

  const sendMessage = (message: string) => {
    if (socket) {
      socket.emit('chat message', message);
    }
  };

  return { isConnected, messages, sendMessage };
};
We’re using a custom hook for several reasons:
- Encapsulation: It encapsulates all the WebSocket logic in one place, making it easier to manage and reuse across different components.
- Separation of Concerns: It separates the WebSocket functionality from the UI components, improving code organization and maintainability.
- Reusability: We can easily use this hook in multiple components that need WebSocket functionality.
- State Management: The hook manages its own state (connection status, messages), which can be easily accessed by any component using the hook.
- Lifecycle Management: It handles connecting and disconnecting from the WebSocket server, ensuring proper resource management.
By encapsulating this logic in a custom hook, we keep our components clean and promote reusability.
3.3 Building the Chat UI
Now that we have our WebSocket connection set up and our custom hook ready, let’s create a simple chat interface. This interface will demonstrate the real-time capabilities of our WebSocket implementation.
Our chat UI will consist of several key elements:
- Connection Status Indicator: This will show whether we’re connected to the WebSocket server.
- Message Display Area: A scrollable area where all chat messages will be displayed.
- Message Input: A form with a text input where users can type their messages.
- Send Button: A button to submit new messages.
We’ll use React’s state management to handle the input message and our custom useSocket hook to manage the WebSocket connection and message history.
Here’s a breakdown of what our component will do:
- Use the
useSockethook to get the connection status, message history, and send function. - Manage the input message state with
useState. - Handle form submission, sending the message and clearing the input.
- Render the UI elements, including the message history and input form.
Let’s implement this chat interface. Update your app/page.tsx with the following code:
'use client';

import { useState } from 'react';
import { useSocket } from '../hooks/useSocket';

export default function Home() {
  const { isConnected, messages, sendMessage } = useSocket();
  const [inputMessage, setInputMessage] = useState('');

  const handleSubmit = (e: React.FormEvent) => {
    e.preventDefault();
    if (inputMessage.trim()) {
      sendMessage(inputMessage);
      setInputMessage('');
    }
  };

  return (
    <main className="flex min-h-screen flex-col items-center justify-center p-24 bg-gray-100">
      <div className="w-full max-w-md bg-white rounded-lg shadow-md p-6">
        <h1 className="text-2xl font-bold mb-4 text-center">WebSocket Chat Demo</h1>
        <div className={`mb-4 text-center ${isConnected ? 'text-green-500' : 'text-red-500'}`}>
          {isConnected ? 'Connected' : 'Disconnected'}
        </div>
        <div className="mb-4 h-64 overflow-y-auto border border-gray-300 rounded p-2">
          {messages.map((msg, index) => (
            <p key={index} className="mb-2">{msg}</p>
          ))}
        </div>
        <form onSubmit={handleSubmit} className="flex">
          <input
            type="text"
            value={inputMessage}
            onChange={(e) => setInputMessage(e.target.value)}
            className="flex-grow mr-2 p-2 border border-gray-300 rounded"
            placeholder="Type a message..."
          />
          <button
            type="submit"
            className="bg-blue-500 hover:bg-blue-700 text-white font-bold py-2 px-4 rounded"
            disabled={!isConnected}
          >
            Send
          </button>
        </form>
      </div>
    </main>
  );
}
This creates a simple chat interface with a message list, input field, and send button.
3.4 Testing the Chat Application
Now, let’s test our chat application:
-
Start your development server:
npm run dev -
Open two browser windows at
http://localhost:3000. -
Send messages from both windows to see real-time, two-way communication in action.
3.5 Adding Some Polish
Now that we have a basic chat functionality working, let’s enhance our app with some additional features to make it more user-friendly and visually appealing. We’ll add:
-
Automatic scrolling to the latest message: This ensures that users always see the most recent messages without having to manually scroll.
-
Timestamps for messages: Adding timestamps helps users understand when each message was sent.
-
Different styles for sent and received messages: This visual distinction makes it easier for users to differentiate between their own messages and those from others.
-
Unique identifiers for messages: This helps React efficiently update the UI and prevents potential issues with duplicate messages.
To implement these features, we’ll need to make some changes to our code structure and add some new dependencies. Let’s break it down step by step:
Step 1: Install UUID Package
First, we’ll install the uuid package. This will help us generate unique identifiers for our messages:
npm install uuid @types/uuidThe uuid package provides a simple way to generate unique identifiers, which we’ll use to distinguish between messages. This is particularly useful for keying React elements and managing message state.
Step 2: Update Message Structure
We’ll create a new Message interface to give our messages more structure:
interface Message {
  id: string;
  text: string;
  timestamp: Date;
  isSent: boolean;
}
This structure allows us to include all the necessary information for each message, including its unique ID, the message text, when it was sent, and whether it was sent by the current user.
Step 3: Implement Auto-scrolling
We’ll use a React ref to automatically scroll to the latest message whenever a new one is added:
const messagesEndRef = useRef<HTMLDivElement>(null);

useEffect(() => {
  messagesEndRef.current?.scrollIntoView({ behavior: "smooth" });
}, [messages]);
Step 4: Update Message Processing
We’ll modify how we process incoming messages to fit our new structure and prevent duplicates:
useEffect(() => {
  // Process all new socket messages
  const newMessages = socketMessages.map(msg => {
    if (typeof msg === 'string') {
      // If it's just a string, create a new message object
      return { id: uuidv4(), text: msg, timestamp: new Date(), isSent: false };
    }
    // If it's already an object, ensure it has an id and set isSent to false
    return { ...msg, id: msg.id || uuidv4(), isSent: false };
  });

  setMessages(prevMessages => {
    // Filter out any duplicates based on the id
    const uniqueNewMessages = newMessages.filter(
      newMsg => !prevMessages.some(prevMsg => prevMsg.id === newMsg.id)
    );
    return [...prevMessages, ...uniqueNewMessages];
  });
}, [socketMessages]);
Step 5: Update the UI
Finally, we’ll update our JSX to incorporate these new features:
<div className="mb-4 h-64 overflow-y-auto border border-gray-300 rounded p-2">
  {messages.map((msg) => (
    <div key={msg.id} className={`mb-2 ${msg.isSent ? 'text-right' : 'text-left'}`}>
      <span className={`inline-block p-2 rounded-lg ${msg.isSent ? 'bg-blue-500 text-white' : 'bg-gray-200 text-gray-800'}`}>
        {msg.text}
      </span>
      <div className="text-xs text-gray-500 mt-1">
        {new Date(msg.timestamp).toLocaleTimeString()}
      </div>
    </div>
  ))}
  <div ref={messagesEndRef} />
</div>
Now, let’s put it all together in our app/page.tsx:
'use client';
import { useState, useEffect, useRef } from 'react';
import { useSocket } from '../hooks/useSocket';
import { v4 as uuidv4 } from 'uuid';

interface Message {
  id: string;
  text: string;
  timestamp: Date;
  isSent: boolean;
}

export default function Home() {
  const { isConnected, messages: socketMessages, sendMessage } = useSocket();
  const [inputMessage, setInputMessage] = useState('');
  const [messages, setMessages] = useState<Message[]>([]);
  const messagesEndRef = useRef<HTMLDivElement>(null);

  useEffect(() => {
    // Process all new socket messages
    const newMessages = socketMessages.map(msg => {
      if (typeof msg === 'string') {
        // If it's just a string, create a new message object
        return { id: uuidv4(), text: msg, timestamp: new Date(), isSent: false };
      }
      // If it's already an object, ensure it has an id and set isSent to false
      return { ...msg, id: msg.id || uuidv4(), isSent: false };
    });

    setMessages(prevMessages => {
      // Filter out any duplicates based on the id
      const uniqueNewMessages = newMessages.filter(
        newMsg => !prevMessages.some(prevMsg => prevMsg.id === newMsg.id)
      );
      return [...prevMessages, ...uniqueNewMessages];
    });
  }, [socketMessages]);

  useEffect(() => {
    messagesEndRef.current?.scrollIntoView({ behavior: "smooth" });
  }, [messages]);

  const handleSubmit = (e: React.FormEvent) => {
    e.preventDefault();
    if (inputMessage.trim()) {
      const newMessage = { id: uuidv4(), text: inputMessage, timestamp: new Date(), isSent: true };
      sendMessage(newMessage);
      setMessages(prev => [...prev, newMessage]);
      setInputMessage('');
    }
  };

  return (
    <main className="flex min-h-screen flex-col items-center justify-center p-24 bg-gray-100">
      <div className="w-full max-w-md bg-white rounded-lg shadow-md p-6">
        <h1 className="text-2xl font-bold mb-4 text-center">WebSocket Broadcast Demo</h1>
        <div className={`mb-4 text-center ${isConnected ? 'text-green-500' : 'text-red-500'}`}>
          {isConnected ? 'Connected' : 'Disconnected'}
        </div>
        <div className="mb-4 h-64 overflow-y-auto border border-gray-300 rounded p-2">
          {messages.map((msg) => (
            <div key={msg.id} className={`mb-2 ${msg.isSent ? 'text-right' : 'text-left'}`}>
              <span className={`inline-block p-2 rounded-lg ${msg.isSent ? 'bg-blue-500 text-white' : 'bg-gray-200 text-gray-800'}`}>
                {msg.text}
              </span>
              <div className="text-xs text-gray-500 mt-1">
                {new Date(msg.timestamp).toLocaleTimeString()}
              </div>
            </div>
          ))}
          <div ref={messagesEndRef} />
        </div>
        <form onSubmit={handleSubmit} className="flex">
          <input
            type="text"
            value={inputMessage}
            onChange={(e) => setInputMessage(e.target.value)}
            className="flex-grow mr-2 p-2 border border-gray-300 rounded"
            placeholder="Type a message..."
          />
          <button
            type="submit"
            className="bg-blue-500 hover:bg-blue-700 text-white font-bold py-2 px-4 rounded"
            disabled={!isConnected}
          >
            Send
          </button>
        </form>
      </div>
    </main>
  );
}
These enhancements significantly improve our chat application:
- The
Messageinterface provides a clear structure for our chat messages. - UUID generation ensures each message has a unique identifier.
- Different styling for sent and received messages improves readability.
- Timestamps give context to when each message was sent.
- Auto-scrolling ensures the most recent messages are always visible.
- Duplicate prevention logic maintains the integrity of our message history.
With these changes, we’ve created a more polished and user-friendly chat experience, showcasing the power of real-time communication with WebSockets.
3.6 Conclusion
Wow! You’ve just built your first real-time chat application using WebSockets and Next.js. Pretty cool, right? This demo really showcases the power of WebSockets for creating interactive, real-time web applications. We’ve covered a lot of ground, from setting up our Next.js project with Socket.IO to implementing a basic chat interface with some nifty features.
Let’s quickly recap what we’ve accomplished:
- Set up a Next.js project with WebSocket support using Socket.IO
- Created a custom server to handle WebSocket connections
- Implemented a custom React hook for WebSocket communication
- Built a simple chat interface with real-time messaging capabilities
- Added some polish with message styling, timestamps, and auto-scrolling
But hey, this is just the beginning! There’s so much more you can do with WebSockets. Here are some ideas to take your chat app to the next level:
- Add user names or avatars to personalize the experience
- Implement private messaging for one-on-one conversations
- Spice things up with emoji support (because who doesn’t love emojis?)
- Create chat rooms for group discussions
Remember, WebSockets open up a whole world of possibilities for real-time features in your web applications. The sky’s the limit!
What’s Coming Next?
Excited to learn more? You should be! In the next part of this series, we’re going to dive even deeper into the world of real-time web applications. Here’s a sneak peek of what’s coming up in Part 2:
-
Advanced Chat Features: We’ll take our chat app to the next level with cool additions like typing indicators and online user lists.
-
Real-Time Notifications: Learn how to implement a system-wide notification feature that keeps all users in the loop.
So, don’t stop here! Keep exploring, keep coding, and get ready for even more exciting real-time features in the next part of our WebSockets with Next.js series.
And don’t forget to stick around for Part 3, where we’ll dive into advanced WebSocket concepts and best practices, including private messaging, error handling, security considerations, and more!


