Authentication is a critical component of modern web applications, ensuring that only authorized users can access protected resources and perform specific actions. In this article, we’ll explore how to implement authentication in a Next.js 14 application using the powerful NextAuth.js library. NextAuth.js complements Next.js by offering a comprehensive and customizable authentication solution.
Throughout this guide, we’ll walk through the process of setting up NextAuth.js, configuring authentication providers, integrating with a database for user data persistence, protecting routes, and accessing user session data. By the end of this article, you’ll have a solid understanding of how to implement secure authentication in your Next.js application. So, let’s get started!
1. Setting Up NextAuth.js
Alright, let’s start by setting up NextAuth.js in our Next.js 14 project. First, make sure you have a Next.js project ready. If you don’t have one yet, you can create a new one by running the following command in your terminal:
npx create-next-app@latest my-nextjs-appOnce you have your project set up, navigate into the project directory:
cd my-nextjs-appNext, let’s install NextAuth.js using yarn. Run the following command:
yarn add next-authNow that NextAuth.js is installed, it’s time to configure it. Create a new file called [...nextauth].js in the pages/api/auth directory of your project:
touch "pages/api/auth/[...nextauth].js"Open up the [...nextauth].js file and add the following code:
import NextAuth from "next-auth"

export default NextAuth({
  providers: [],
  // Add other NextAuth.js configurations here
})
In this file, we’re defining our NextAuth.js configuration. The providers array is where we’ll specify the authentication providers we want to use, such as credentials, magic links, or social media logins. We’ll dive into that in the next section.
Lastly, we need to set up some environment variables for NextAuth.js. NextAuth.js requires a secret key to sign and encrypt tokens. You can generate a secret key using the following command:
openssl rand -base64 32Create a new file called .env.local in the root directory of your project and add the following variables:
NEXTAUTH_SECRET=your_generated_secret_key
NEXTAUTH_URL=http://localhost:3000
Replace your_generated_secret_key with the secret key you generated.
Alternatively, you can use a package like dotenv to load environment variables from a .env file. Install dotenv by running:
yarn add dotenvThen, create a .env file in the root directory of your project and add the environment variables:
NEXTAUTH_SECRET=your_generated_secret_key
NEXTAUTH_URL=http://localhost:3000
Make sure to load the environment variables in your pages/api/auth/[...nextauth].js file:
import NextAuth from "next-auth"
import dotenv from "dotenv"

dotenv.config()

export default NextAuth({
  providers: [],
  // Add other NextAuth.js configurations here
})
Another option is to use a tool like direnv to manage your environment variables. direnv allows you to define project-specific environment variables in a .envrc file. Install direnv by following the installation instructions for your operating system.
Create a .envrc file in the root directory of your project and add the environment variables:
export NEXTAUTH_SECRET=your_generated_secret_key
export NEXTAUTH_URL=http://localhost:3000
Make sure to allow direnv to load the environment variables by running: direnv allow.
Configuring the SessionProvider
After setting up NextAuth.js, it’s crucial to wrap your entire application with the SessionProvider. This component makes the authentication session available throughout your Next.js app.
Create or update your pages/_app.js file with the following content:
import { SessionProvider } from "next-auth/react";
import "@/styles/globals.css";

function MyApp({ Component, pageProps }) {
  return (
    <SessionProvider session={pageProps.session}>
      <Component {...pageProps} />
    </SessionProvider>
  );
}

export default MyApp;
In this setup:
- We import the SessionProvider from next-auth/react.
- We wrap our entire application (<Component {…pageProps} />) with the SessionProvider.
- We pass the session from pageProps to the SessionProvider.
This configuration ensures that the user’s session is available throughout your application, allowing you to easily access authentication state in all your components.
By setting up the SessionProvider in this way, you’ll be able to use NextAuth.js hooks and utilities in any component, making it simple to protect routes, display user-specific content, and manage authentication flows across your Next.js application.
And there you have it! NextAuth.js is now set up and ready to rock in your Next.js 14 project. In the next section, we’ll explore different authentication providers and how to implement them. Get ready to level up your authentication game!
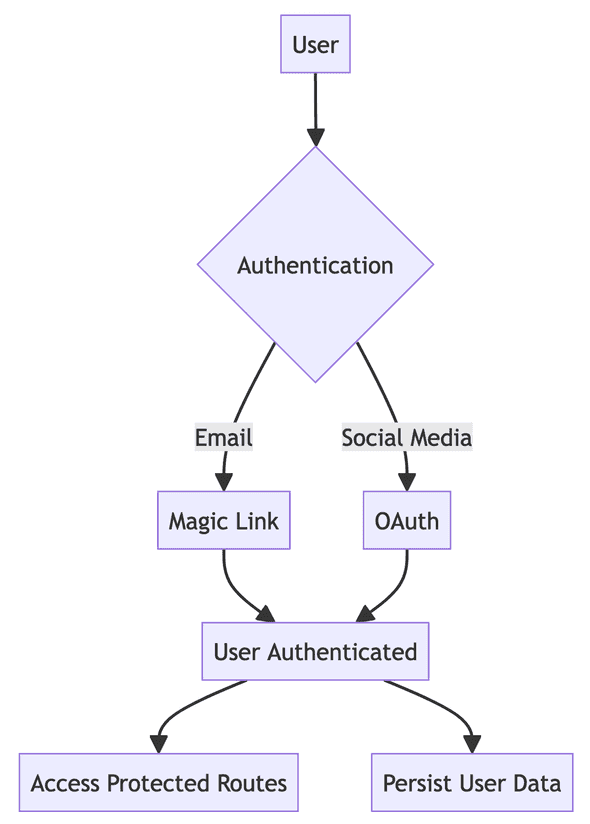
2. Choosing Authentication Providers
Now that we have NextAuth.js set up, it’s time to choose and implement the authentication providers that you need. NextAuth.js supports a variety of authentication providers, making it easy to implement different login methods for your users. Let’s explore some popular options:
-
1. Email and Password (Credentials):
- This is a familiar login method for most users.
- You have full control over user data.
- However, you need to securely manage user credentials and handle password resets.
-
2. Magic Links via Email:
- Users receive a special link in their email to log in, eliminating the need for passwords.
- This simplifies the onboarding process for new users.
- Keep in mind that users need access to their email to log in.
-
3. Social Media Logins (e.g., Twitter, Facebook, Google):
- Users can log in using their existing social media accounts.
- This reduces sign-up friction and provides a convenient login experience.
- However, users must have accounts on the respective platforms to use this method.
2.1 Implementing Magic Links via Email
To set up an authentication provider, you need to add it to the providers array in your authOptions configuration. Here’s an example of how to add the Email provider for magic links:
import NextAuth from "next-auth";
import EmailProvider from "next-auth/providers/email";
import sendLoginEmail from "./lib/emailSenders/sendLogin";

export const authOptions = {
  providers: [
    EmailProvider({
      from: process.env.EMAIL_FROM,
      maxAge: 2 * 60 * 60,
      sendVerificationRequest: sendLoginEmail,
    }),
  ],
  pages: {
    signIn: "/auth/login",
    error: "/auth/error",
    verifyRequest: "/auth/verify-request",
  },
  // ...
};

export default NextAuth(authOptions);
In this example, we import the EmailProvider and add it to the providers array. The from option specifies the sender’s email address, maxAge sets the expiration time for the magic link (2 hours in this case), and sendVerificationRequest is a custom function that sends the login email.
Here’s a simplified version of the sendLoginEmail function:
import { SendVerificationRequestParams } from "next-auth/providers/email";
import { sendEmail } from "./lib/emailService";

async function sendLoginEmail(params) {
  const { identifier, url, provider } = params;
  const { host } = new URL(url);

  const htmlContent = `
    <p>Click the button below to login:</p>
    <a href="${url}">Login to MyApp</a>
    <p>If you didn't request to login, please ignore this email.</p>
  `;

  await sendEmail({
    to: identifier,
    from: provider.from,
    subject: `Login to MyApp`,
    html: htmlContent,
  });
}

export default sendLoginEmail;
In this function, we extract the necessary information from the params object and construct a simple HTML email template with the login link. We then use a custom sendEmail function to send the email to the user.
Here’s an example of the sendEmail function using Nodemailer:
import nodemailer from "nodemailer";

export async function sendEmail({ to, from, subject, html }) {
  const transporter = nodemailer.createTransport({
    // Configure your email provider settings (e.g., SMTP)
    // For example, using Gmail SMTP:
    service: "gmail",
    auth: {
      user: process.env.EMAIL_USER,
      pass: process.env.EMAIL_PASSWORD,
    },
  });

  const mailOptions = {
    from,
    to,
    subject,
    html,
  };

  await transporter.sendMail(mailOptions);
}
Note that while Nodemailer is a popular choice for sending emails, it’s recommended to use a reliable email delivery service like Postmark, Amazon SES, or Mailgun to ensure better deliverability and avoid potential issues with email providers.
After sending the login link, you can display a verification page to the user:
import { NextPage } from "next";
import Link from "next/link";

const VerifyRequest = () => {
  return (
    <div>
      <h1>Check your inbox</h1>
      <p>A login link has been sent to your email address.</p>
      <p>This link will expire in <strong>two hours</strong>.</p>
      <p>
        <Link href="/auth/login">I did not receive my email.</Link>
      </p>
    </div>
  );
};

export default VerifyRequest;
This page informs the user that a login link has been sent to their email and provides instructions on what to do next.
To complete the magic link authentication flow, let’s create a login page where users can enter their email address to receive the magic link. Create a new file pages/auth/login.js with the following content:
import { useState, FormEvent } from "react";
import { NextPage } from "next";
import { signIn } from "next-auth/react";

const Login = () => {
  const [email, setEmail] = useState("");

  const handleSubmit = async (e) => {
    e.preventDefault();
    await signIn("email", { email, callbackUrl: "/orders" });
  };

  return (
    <div>
      <h2>Login to your account</h2>
      <form onSubmit={handleSubmit}>
        <label htmlFor="email-address">Email address</label>
        <input
          id="email-address"
          type="email"
          value={email}
          onChange={(e) => setEmail(e.target.value)}
          required
          placeholder="Email address"
        />
        <button type="submit">Login with email</button>
      </form>
    </div>
  );
};

export default Login;
In this login page, users can enter their email address and submit the form. The signIn function from next-auth/react is called with the “email” provider and the entered email address. The callbackUrl parameter specifies the page to redirect to after successful authentication.
Finally, let’s create an error page to handle authentication errors. Create a new file pages/auth/error.js with the following content:
import { NextPage } from "next";
import { useRouter } from "next/router";

const ErrorPage = () => {
  const {
    query: { error },
  } = useRouter();

  return (
    <div>
      <h1>Error</h1>
      <p>{error}</p>
    </div>
  );
};

export default ErrorPage;
This error page retrieves the error message from the URL query parameter and displays it to the user.
And there you have it! You’ve successfully implemented the EmailProvider for magic link authentication in your Next.js app. In the next section, we’ll dive into database integration for persisting user data.
2.2 Social Login (Google, Twitter, Facebook)
To add social login options to your Next.js app, you can use the respective providers from next-auth/providers. Here’s how you can configure Google, Twitter, and Facebook providers:
- Install the necessary provider packages:
npm install next-auth next-auth/providers- Update your
pages/api/auth/[...nextauth].jsfile to include the desired providers:
import NextAuth from 'next-auth';
import GoogleProvider from 'next-auth/providers/google';
import TwitterProvider from 'next-auth/providers/twitter';
import FacebookProvider from 'next-auth/providers/facebook';

export const authOptions = {
  providers: [
    GoogleProvider({
      clientId: process.env.GOOGLE_CLIENT_ID,
      clientSecret: process.env.GOOGLE_CLIENT_SECRET,
    }),
    TwitterProvider({
      clientId: process.env.TWITTER_CLIENT_ID,
      clientSecret: process.env.TWITTER_CLIENT_SECRET,
    }),
    FacebookProvider({
      clientId: process.env.FACEBOOK_CLIENT_ID,
      clientSecret: process.env.FACEBOOK_CLIENT_SECRET,
    }),
  ],
  // ...
};- Obtain the necessary API keys and secrets from the respective developer platforms:
- Google: Go to the Google Developer Console, create a new project, and set up OAuth 2.0 credentials. Obtain the client ID and client secret.
- Twitter: Create a new app in the Twitter Developer Portal, and obtain the consumer key and consumer secret.
- Facebook: Create a new app in the Facebook Developer Portal, and obtain the app ID and app secret.
- Add the obtained keys and secrets to your .env.local file:
GOOGLE_CLIENT_ID=your_google_client_id
GOOGLE_CLIENT_SECRET=your_google_client_secret
TWITTER_CLIENT_ID=your_twitter_client_id
TWITTER_CLIENT_SECRET=your_twitter_client_secret
FACEBOOK_CLIENT_ID=your_facebook_client_id
FACEBOOK_CLIENT_SECRET=your_facebook_client_secret- Create login buttons for each provider in your login page component (e.g.,
pages/login.js):
import { signIn } from 'next-auth/react';

const LoginPage = () => {
  return (
    <div>
      <h1>Login</h1>
      <button onClick={() => signIn('google')}>Sign in with Google</button>
      <button onClick={() => signIn('twitter')}>Sign in with Twitter</button>
      <button onClick={() => signIn('facebook')}>Sign in with Facebook</button>
    </div>
  );
};

export default LoginPage;- Handle the login flow and navigation:
- When a user clicks on a provider’s login button, the
signInfunction from next-auth/react is called with the provider’s name (e.g.,'google', 'twitter', 'facebook'). - NextAuth.js will handle the OAuth flow and redirect the user to the provider’s login page.
- After successful authentication, the user will be redirected back to your app’s callback URL (e.g.,
/api/auth/callback/google). - NextAuth.js will then create a session for the authenticated user and redirect them to the specified
callbackUrl(default is/).
- Access the user’s session information in your pages or components using the
useSessionhook fromnext-auth/react:
import { useSession } from 'next-auth/react';

const ProfilePage = () => {
  const { data: session, status } = useSession();

  if (status === 'loading') {
    return <div>Loading...</div>;
  }

  if (session) {
    return (
      <div>
        <h1>Welcome, {session.user.name}!</h1>
        <p>Email: {session.user.email}</p>
        <img src={session.user.image} alt="User Avatar" />
      </div>
    );
  }

  return <div>Please sign in to access your profile.</div>;
};

export default ProfilePage;
With these steps, you’ve successfully added social login options to your Next.js app using NextAuth.js. Users can now sign in using their Google, Twitter, or Facebook accounts, and you can access their session information in your pages and components.
Remember to handle user session persistence, secure your API routes, and customize the login flow and UI to fit your application’s needs.
In the next section, let’s explore how to integrate a database to store user information and additional data related to your application.
3. Database Integration for Persistence
NextAuth.js can handle user sessions using cookies without requiring a database. This means that user session information is stored directly in the browser’s cookies. However, if you want to store and manage user information beyond just the session, such as user profiles, preferences, or additional data, you’ll need to integrate a database. NextAuth.js supports a wide variety of databases through its adapter system, giving you the flexibility to choose the one that best suits your application’s requirements.
However, in most real-world scenarios, you’ll want to have a database to store and manage user information. Here are some common reasons why:
- Storing User Details: When you have registered users in your application, you’ll typically want to store their login details, such as email addresses and hashed passwords, in a database. This allows you to authenticate users securely and persist their information across sessions.
- User Profiles and Preferences: If your application allows users to create profiles, update their information, or set preferences, you’ll need a database to store and retrieve this data. With a database, you can associate user-specific data with their accounts and persist it beyond individual sessions.
- Authentication Flows: Some authentication flows, like magic links or email verification, involve generating and storing temporary tokens or verification codes. These tokens need to be securely stored and validated, which requires a database. The database allows you to manage and expire these tokens as needed.
- Scalability and Performance: As your application grows and handles more users and sessions, managing everything solely with cookies can become inefficient. By storing session data in a database, you can distribute the load across multiple servers and handle a larger number of concurrent users. This improves scalability and performance, especially in high-traffic scenarios.
Supported Database Providers
NextAuth.js offers adapters for various databases, giving you the flexibility to choose the one that aligns with your tech stack and requirements. Some popular database providers supported by NextAuth.js include:
- Prisma: Prisma is a modern database toolkit that simplifies database management and provides a type-safe API for querying and mutating data. It supports multiple databases, including PostgreSQL, MySQL, and SQLite.
- PostgreSQL: PostgreSQL is a powerful, open-source relational database known for its reliability, scalability, and extensive feature set. NextAuth.js provides adapters for using PostgreSQL directly or through ORMs like Prisma.
- SQLite: SQLite is a lightweight, file-based relational database that is easy to set up and suitable for development and testing environments. NextAuth.js offers adapters for SQLite, making it convenient for local development.
- MongoDB: MongoDB is a popular NoSQL database that offers flexibility and scalability. NextAuth.js provides adapters for MongoDB, allowing you to store user and session data in a document-oriented format.
It’s worth noting that NextAuth.js no longer ships with a default database adapter. Instead, you have the freedom to choose the adapter that best suits your needs and install it separately.
Setting up PostgreSQL
Before we set up Prisma, let’s ensure we have PostgreSQL installed and configured on our system. Follow the instructions for your operating system:
For macOS:
- Install PostgreSQL using Homebrew:
brew install postgresql- Start the PostgreSQL service:
brew services start postgresqlFor Ubuntu or WSL2:
- Update your package list and install PostgreSQL:
sudo apt update
sudo apt install postgresql postgresql-contrib- Start the PostgreSQL service:
sudo service postgresql start- Switch to the postgres user to create a new user:
sudo -i -u postgresCreating the Database and User
The following steps are similar for both macOS and WSL2 Ubuntu. Create a new database and user for our project using the following script:
#!/bin/bash

DB_NAME="ffiq_dev"
DB_USER="ffiq_dbuser"
DB_PASSWORD="your_secure_password"

# For macOS, use psql postgres
# For WSL2 Ubuntu, use sudo -u postgres psql
PSQL_CMD="psql postgres"
# Uncomment the following line if you're using WSL2 Ubuntu:
# PSQL_CMD="sudo -u postgres psql"

$PSQL_CMD <<EOF
CREATE USER $DB_USER WITH PASSWORD '$DB_PASSWORD';
CREATE DATABASE $DB_NAME;
GRANT ALL PRIVILEGES ON DATABASE $DB_NAME TO $DB_USER;
\c $DB_NAME
CREATE SCHEMA public;
GRANT ALL ON SCHEMA public TO $DB_USER;
GRANT ALL ON ALL TABLES IN SCHEMA public TO $DB_USER;
EOF

echo "Database and user created successfully!"
echo "Your DATABASE_URL is: postgresql://$DB_USER:$DB_PASSWORD@localhost:5432/$DB_NAME?schema=public"
Save this script as setup_db.sh, make it executable with chmod +x setup_db.sh. I normally keep my scripts inside a scripts folder in my nextjs projects, where i have some utility scripts that make easier development and deployment. Then run it: ./setup_db.sh
This script creates a new PostgreSQL user and database for your project, and outputs the DATABASE_URL you’ll need for your .env file.
After running the script, you’ll see your DATABASE_URL. It should look something like this:
DATABASE_URL="postgresql://dbuser:your_secure_password@localhost:5432/db_dev?schema=public"Make sure to add this URL to your .env file.
Note for WSL2 Ubuntu Users
If you’re using WSL2 Ubuntu and want to connect to PostgreSQL from Windows, you might need to modify PostgreSQL’s configuration to allow connections from the Windows host. Here are the steps:
- Edit the PostgreSQL configuration file:
sudo nano /etc/postgresql/[version]/main/postgresql.confReplace [version] with your PostgreSQL version number.
- Find the line that says
#listen_addresses = 'localhost'and change it to:
listen_addresses = '*'- Save and exit the file (Ctrl+X, then Y, then Enter in nano).
- Edit the client authentication configuration file:
sudo nano /etc/postgresql/[version]/main/pg_hba.conf- Add the following line at the end of the file:
host all all 172.16.0.0/12 md5This allows connections from the IP range typically used by WSL2.
- Restart PostgreSQL:
sudo service postgresql restart.
Now you should be able to connect to your PostgreSQL database from both WSL2 Ubuntu and Windows.
Setting Up Prisma with PostgreSQL
Let’s walk through the steps to set up Prisma with PostgreSQL for NextAuth.js:
- Install the required dependencies:
npm install @prisma/client @next-auth/prisma-adapter
npm install prisma --save-dev- Create a new Prisma schema file (
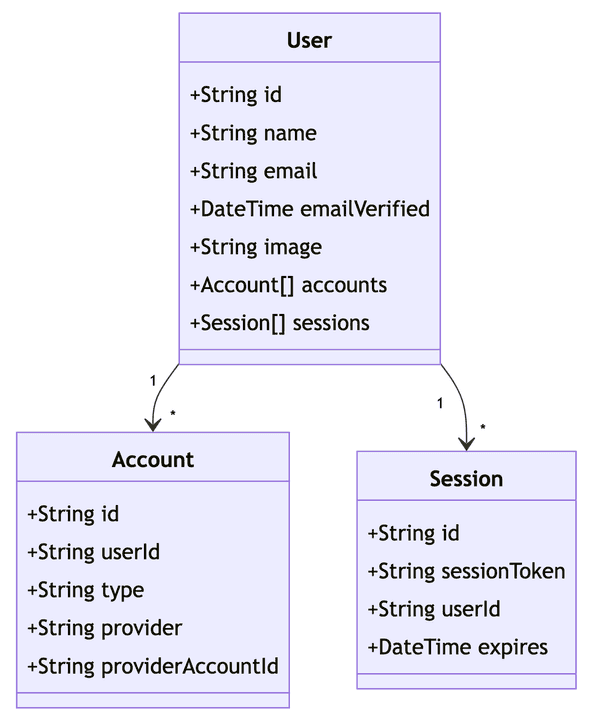
schema.prisma) and define the models for NextAuth.js:
datasource db {
  provider = "postgresql"
  url      = env("DATABASE_URL")
}

generator client {
  provider = "prisma-client-js"
}

model User {
  id            String    @id @default(cuid())
  name          String?
  email         String?   @unique
  emailVerified DateTime?
  image         String?
  accounts      Account[]
  sessions      Session[]
}

model Account {
  id                 String  @id @default(cuid())
  userId             String
  type               String
  provider           String
  providerAccountId  String
  refresh_token      String? @db.Text
  access_token       String? @db.Text
  expires_at         Int?
  token_type         String?
  scope              String?
  id_token           String? @db.Text
  session_state      String?

  user User @relation(fields: [userId], references: [id], onDelete: Cascade)

  @@unique([provider, providerAccountId])
}

model Session {
  id           String   @id @default(cuid())
  sessionToken String   @unique
  userId       String
  expires      DateTime
  user         User     @relation(fields: [userId], references: [id], onDelete: Cascade)
}

model VerificationToken {
  identifier String
  token      String   @unique
  expires    DateTime

  @@unique([identifier, token])
}
Regarding the Prisma schema, it defines the structure of your database tables and the relationships between them. In the provided schema example, we have models for User, Account, Session, and VerificationToken.
If you want to extend the schema to include additional customer data, you can modify the User model or create a new model that has a foreign key relationship with the User model. For example, let’s say you want to store the customer’s address:
model User {
  id            String    @id @default(cuid())
  name          String?
  email         String?   @unique
  emailVerified DateTime?
  image         String?
  accounts      Account[]
  sessions      Session[]
  address       Address?
}

model Address {
  id        String  @id @default(cuid())
  street    String
  city      String
  state     String
  zipCode   String
  user      User    @relation(fields: [userId], references: [id], onDelete: Cascade)
  userId    String  @unique
}- Set up the database connection URL in your
.envfile:
DATABASE_URL="postgresql://user:password@localhost:5432/mydatabase?schema=public"In this extended schema, we added an Address model that has a one-to-one relationship with the User model. The userId field in the Address model serves as the foreign key that references the id field in the User model. The @relation attribute defines the relationship between the models, and the onDelete: Cascade ensures that if a user is deleted, their associated address is also deleted.
You can further extend the schema to include any additional customer data fields or relationships based on your application’s requirements.
- Run Prisma migrations to create the necessary tables in the database:
npx prisma migrate dev- Update your NextAuth.js configuration to use the Prisma adapter:
import { PrismaAdapter } from "@next-auth/prisma-adapter";
import { PrismaClient } from "@prisma/client";

const prisma = new PrismaClient();

export const authOptions = {
  adapter: PrismaAdapter(prisma),
  providers: // etc
};
With these steps, you have successfully integrated Prisma with PostgreSQL for NextAuth.js. Prisma will handle the database operations, and NextAuth.js will use the Prisma adapter to persist user and session data.
Alternative Database Options
NextAuth.js provides adapters for various other databases, such as SQLite, MySQL, and MongoDB. The setup process may vary slightly depending on the chosen database. NextAuth.js’s adapter system makes it easy to switch between different databases, giving you the flexibility to choose the one that best fits your application’s requirements.
By integrating a database with NextAuth.js, you can persist user information, implement specific authentication flows, and scale your application effectively. NextAuth.js’s support for multiple database providers ensures that you have the freedom to choose the database that aligns with your tech stack and project needs.
4. Protecting Routes and Pages
Now that we have NextAuth.js set up and configured with authentication providers, let’s explore how to protect routes and pages based on user authentication status. NextAuth.js provides a convenient way to restrict access to certain pages and display user-specific content.
4.1 Protecting Pages with NextAuth.js Middleware
NextAuth.js offers a middleware that allows you to protect routes and pages based on user authentication status. To get started, create a new file named middleware.js in the root directory of your Next.js project:
import { withAuth } from "next-auth/middleware";

export default withAuth(
  function middleware(req) {
    // Your middleware logic here
  },
  {
    callbacks: {
      authorized: ({ token }) => !!token,
    },
  }
);

export const config = { matcher: ["/protected"] };
In this example, the withAuth middleware is used to protect routes. The authorized callback checks if a valid token exists, indicating that the user is authenticated.
4.2 Redirecting Unauthenticated Users
You can redirect unauthenticated users to the login page by modifying the middleware:
import { withAuth } from "next-auth/middleware";
import { NextResponse } from "next/server";

export default withAuth(
  function middleware(req) {
    if (req.nextUrl.pathname.startsWith("/protected") && !req.nextauth.token) {
      return NextResponse.redirect(new URL("/auth/login", req.url));
    }
  },
  {
    callbacks: {
      authorized: ({ token }) => !!token,
    },
  }
);

export const config = { matcher: ["/protected"] };
In this updated middleware, if the user is not authenticated and tries to access a protected route (e.g., /protected), they will be redirected to the login page (/auth/login).
4.3 Accessing User Session Data
NextAuth.js provides the useSession hook from next-auth/react to access the user’s session data in your pages and components. You can use this hook to conditionally render content based on the user’s authentication status.
import { useSession } from "next-auth/react";

function ProfilePage() {
  const { data: session, status } = useSession();

  if (status === "loading") {
    return <div>Loading...</div>;
  }

  if (status === "unauthenticated") {
    return <div>Access denied. Please log in.</div>;
  }

  return (
    <div>
      <h1>Welcome, {session.user.name}!</h1>
      {/* User-specific content */}
    </div>
  );
}

export default ProfilePage;
In this example, the useSession hook is used to access the user’s session data. Based on the authentication status, you can conditionally render content or show appropriate messages.
4.4 Handling Sign-In and Sign-Out
NextAuth.js provides the signIn and signOut functions from next-auth/react to handle user sign-in and sign-out processes. You can use these functions within your pages or components to initiate the authentication flow.
import { signIn, signOut } from "next-auth/react";

function LoginButton() {
  const handleLogin = () => {
    signIn();
  };

  const handleLogout = () => {
    signOut();
  };

  return (
    <div>
      <button onClick={handleLogin}>Login</button>
      <button onClick={handleLogout}>Logout</button>
    </div>
  );
}

export default LoginButton;
In this example, the signIn function is called when the user clicks the “Login” button, initiating the authentication flow. Similarly, the signOut function is called when the user clicks the “Logout” button, logging them out of the application.
By utilizing NextAuth.js middleware, the useSession hook, and the signIn and signOut functions, you can effectively protect routes and pages, conditionally render content based on authentication status, and handle user sign-in and sign-out processes in your Next.js application.
5. Accessing User Session Data
NextAuth.js provides API routes and server-side functions to securely access user session data. You can fetch the user session on the server-side and utilize it in your components. In this section, we’ll explore how to access session data using NextAuth.js API routes and server-side functions, and discuss when to use each approach.
5.1 Using NextAuth.js API routes:
NextAuth.js automatically creates API routes for authentication. You can access the current user’s session data by making a request to the /api/auth/session route. This approach is useful when you need to fetch session data on the client-side and update the UI accordingly.
import { useEffect, useState } from 'react';

function ProfilePage() {
  const [session, setSession] = useState(null);

  useEffect(() => {
    const fetchSession = async () => {
      const response = await fetch('/api/auth/session');
      const session = await response.json();
      setSession(session);
    };

    fetchSession();
  }, []);

  if (!session) {
    return <div>Loading...</div>;
  }

  return (
    <div>
      <h1>Welcome, {session.user.name}!</h1>
      {/* User-specific content */}
    </div>
  );
}

export default ProfilePage;
In this example, the /api/auth/session route is called to fetch the user’s session data. The session data is then stored in the component’s state and used to render user-specific content.
5.2 Fetching User Session on the Server-side
For certain scenarios, such as server-side rendering or handling sensitive data, you may need to fetch the user session on the server-side. NextAuth.js provides the unstable_getServerSession function from next-auth/next to accomplish this.
import { unstable_getServerSession } from 'next-auth/next';

function ProfilePage({ session }) {
  if (!session) {
    return <div>Access denied. Please log in.</div>;
  }

  return (
    <div>
      <h1>Welcome, {session.user.name}!</h1>
      {/* User-specific content */}
    </div>
  );
}

export async function getServerSideProps(context) {
  const session = await unstable_getServerSession(
    context.req,
    context.res,
    authOptions
  );

  if (!session) {
    return {
      redirect: {
        destination: '/login',
        permanent: false,
      },
    };
  }

  return {
    props: {
      session,
    },
  };
}

export default ProfilePage;
In this example, the unstable_getServerSession function is used in the getServerSideProps function to fetch the user session on the server-side. If the user is not authenticated, they are redirected to the login page. Otherwise, the session data is passed as props to the component.
5.3 Client-side vs. Server-side Session Fetching
Choosing between client-side and server-side session fetching depends on your specific use case and requirements. Here are some guidelines:
-
Use client-side session fetching (
/api/auth/session) when:- You need to update the UI based on the user’s authentication state.
- The session data is not sensitive and can be exposed to the client.
- You want to handle session expiration and refresh tokens on the client-side.
-
Use server-side session fetching (unstable_getServerSession) when:
- You need to access session data during server-side rendering.
- The session data contains sensitive information that should not be exposed to the client.
- You want to enforce authentication checks and redirects on the server-side.
5.4 Handling Session Expiration and Refresh Tokens
When using NextAuth.js, you can configure the session expiration and refresh token behavior. By default, NextAuth.js sessions expire after 30 days, but you can customize this duration based on your application’s security requirements.
To handle session expiration and refresh tokens, you can configure the session and jwt options in your NextAuth.js configuration:
import { NextAuthOptions } from 'next-auth';

export const authOptions = {
  // ...
  session: {
    strategy: 'jwt',
    maxAge: 30 * 24 * 60 * 60, // 30 days
    updateAge: 24 * 60 * 60, // 24 hours
  },
  jwt: {
    secret: process.env.JWT_SECRET,
    encryption: true,
    maxAge: 60 * 60, // 1 hour
  },
};
In this example, the session is set to expire after 30 days (maxAge) and will be updated every 24 hours (updateAge) to extend its validity. The JWT token is set to expire after 1 hour (maxAge) and is encrypted (encryption) for added security.
By configuring these options, NextAuth.js will handle session expiration and refresh tokens automatically, ensuring that users are logged out when their session expires and prompting them to re-authenticate when necessary.
Remember to choose appropriate session and token expiration durations based on your application’s security needs and user experience considerations.
With these techniques, you can effectively access user session data in your Next.js application using NextAuth.js, both on the client-side and server-side, and handle session expiration and refresh tokens easily.
6. Conclusion
In this comprehensive guide, we explored the process of implementing authentication in a Next.js 14 application using the powerful NextAuth.js library. We covered the following key aspects:
- Setting up NextAuth.js in a Next.js project
- Choosing and configuring authentication providers (Email, Social Media)
- Integrating a database for persisting user data (PostgreSQL with Prisma)
- Protecting routes and pages based on authentication status
- Accessing and utilizing user session data in components
NextAuth.js simplifies the authentication process by providing a flexible and customizable solution that integrates seamlessly with Next.js. By leveraging NextAuth.js, you can implement secure authentication flows, support various authentication providers, and persist user data using a database adapter.
Remember to follow security best practices, such as securing sensitive information, hashing passwords, and preventing common vulnerabilities. Regularly update your dependencies and adhere to secure coding practices to ensure the integrity and protection of user data.
As you continue building your Next.js application, consider extending the authentication functionality to meet your specific requirements. Customize the user interface, handle additional user data, and integrate with other services as needed.
By following the steps outlined in this guide, you can create a robust and secure authentication system that enhances the user experience and protects user data in your Next.js application.
If you’re interested in enhancing your NextAuth.js implementation with a smart login feature that remembers users’ preferred authentication methods, check out the follow-up post: Smart Login in Next.js with NextAuth.js.
Once you have authentication set up in your Next.js application, you might want to add more features like a shopping cart. Our post on Building a Shopping Cart with React and Local Storage provides a step-by-step guide on implementing this functionality, which can work well alongside the authentication system we’ve discussed here.


