Table of Contents
- Note on Next.js Routing and Series Information
- 1. Introduction
- 2. Setting Up Your Stripe Subscriptions Project
- 2.5 Key Differences: One-Time Payments vs. Subscriptions
- 3. Setting up Subscription Products in Stripe
- 4. Implementing Subscription Sign-up in Next.js
- 5. Managing Subscriptions
- 6. Handling Subscription Lifecycle Events with Webhooks
- 7. Conclusion
- 8. Next Steps
Note on Next.js Routing and Series Information
This article is Part 2 of a two-part series on integrating Stripe with Next.js:
- Part 1: Stripe Checkout in Next.js: Covers Stripe Checkout integration for one-time payments using Next.js with the Pages Router.
- Part 2 (Current Article): Explores Stripe Subscriptions integration using Next.js with the App Router.
- Advanced Webhooks: Solving Race Conditions: Deep dive into handling webhook race conditions and credit management in Stripe.
The App Router, used in this article, is the newer routing system introduced in Next.js 13. It offers more flexible routing, layouts, and improved server-side rendering capabilities, which are particularly beneficial for implementing complex features like subscription management.
If you’re looking for Stripe integration using the traditional Pages Router or are new to Stripe integration in Next.js, you might want to start with Part 1 of this series.
1. Introduction
Welcome to Part 2 of this guide on integrating Stripe with Next.js! In my previous article (Part 1 of this series), I showed you how to integrate Stripe Checkout for one-time payments in a Next.js application using the Pages Router. Today, in Part 2, I’m taking it a step further by guiding you through the implementation of subscription-based services using the App Router.
Subscriptions are a powerful way to generate recurring revenue and provide ongoing value to your customers. By the end of this guide, you’ll have a good understanding of how to create and manage subscription-based services in your Next.js application using Stripe.
In this tutorial, we’ll cover:
- Setting up your Stripe Subscriptions project with Next.js and the App Router
- Creating subscription products in Stripe
- Implementing a subscription sign-up flow in your Next.js application
- Managing subscriptions using Stripe’s Customer Portal
- Handling subscription lifecycle events with webhooks
By following this step-by-step guide, you’ll be able to implement a subscription system in your Next.js app, taking advantage of the App Router’s improved routing and server-side rendering features.
Let’s start building our subscription-based service!
2. Setting Up Your Stripe Subscriptions Project
Before we start implementing Stripe subscriptions, let’s set up our project and ensure we have all the necessary components in place.
2.1 Creating a New Next.js Project
First, let’s create a new Next.js project for our Stripe subscriptions demo. Open your terminal and run the following command:
npx create-next-app@latest stripe-subscriptions-demoFollow the prompts to set up your project. When asked about TypeScript, ESLint, Tailwind CSS, etc., choose according to your preferences.
Once the project is created, navigate into the project directory:
cd stripe-subscriptions-demo2.2 Setting up a Stripe Account
If you don’t already have a Stripe account, head over to the Stripe website and sign up for an account. Once your account is set up, follow these steps:
- Log in to your Stripe Dashboard
- Navigate to the Developers section
- Find your API keys (publishable key and secret key)
Keep these keys handy as we’ll need them later in our implementation, in section 2.4.
2.3 Installing Required Dependencies
Now that we have our Next.js project and Stripe account set up, let’s install the necessary dependencies. In your project directory, run the following command:
npm install stripe @stripe/stripe-jsThis command installs:
stripe: The official Stripe library for Node.js@stripe/stripe-js: The Stripe.js library for handling Stripe elements in the browser
2.4 Setting Up Environment Variables
To keep our Stripe API keys secure, we’ll use environment variables. Create a new file in your project root called .env.local and add the following:
NEXT_PUBLIC_STRIPE_PUBLISHABLE_KEY=your_publishable_key_here
STRIPE_SECRET_KEY=your_secret_key_here
Replace your_publishable_key_here and your_secret_key_here with your actual Stripe API keys.
In Next.js, .env.local is used for local environment variables. These variables are automatically loaded and available in your application. The NEXT_PUBLIC_ prefix makes a variable accessible on the client-side, while variables without this prefix are only available on the server-side.
For production environments, you’ll need to set these environment variables on your hosting platform. Most platforms (like Vercel, Netlify, or Heroku) provide ways to set environment variables through their dashboard or CLI tools.
For example, if you’re using Vercel, you can set environment variables by:
- Going to your project settings in the Vercel dashboard
- Navigating to the “Environment Variables” section
- Adding each variable (key and value) individually
Remember to add .env.local to your .gitignore file to prevent committing sensitive information to your repository.
With these steps completed, we’re now ready to start implementing Stripe subscriptions in our Next.js application!
2.5 Key Differences: One-Time Payments vs. Subscriptions
Before we dive into implementing subscriptions, let’s highlight some key differences between the one-time payment system we built in Part 1 and the subscription system we’ll build in this article:
-
Product Setup: One-time payments use simple products, while subscriptions require recurring pricing models in Stripe.
-
Checkout Process: One-time payments complete after a single transaction, whereas subscriptions initiate an ongoing billing relationship.
-
User Management: Subscriptions require ongoing user state management to track active subscriptions and access levels.
-
Webhooks: While both systems use webhooks, subscription systems typically handle a broader range of events (e.g., subscription updated, subscription canceled).
-
Customer Portal: Subscription systems often implement Stripe’s Customer Portal for self-service management, which isn’t typically needed for one-time payments.
-
Routing: This article uses the App Router, offering more flexible routing and improved server-side rendering compared to the Pages Router used in Part 1.
Keep these differences in mind as we implement our subscription system.
3. Setting up Subscription Products in Stripe
Before we can offer subscriptions in our application, we need to set them up in the Stripe Dashboard.
- Log in to your Stripe Dashboard
- Navigate to “Products” in the sidebar
- Click “Add product”
- Fill in the product details:
- Name: e.g., “Premium Plan”
- Description: A brief description of your subscription
- Under “Pricing”, select “Recurring”
- Set the price and billing interval (e.g., $9.99 per month)
- Click “Save product”
Repeat this process for any additional subscription tiers you want to offer.
To help visualize this process, here’s a step-by-step video guide:
This video demonstrates the exact steps to create a subscription product in the Stripe Dashboard, making it easier for readers to follow along.
4. Implementing Subscription Sign-up in Next.js
Now that we have our subscription products set up in Stripe, let’s implement the sign-up process in our Next.js application.
Here’s a diagram illustrating the full subscription sign-up flow:
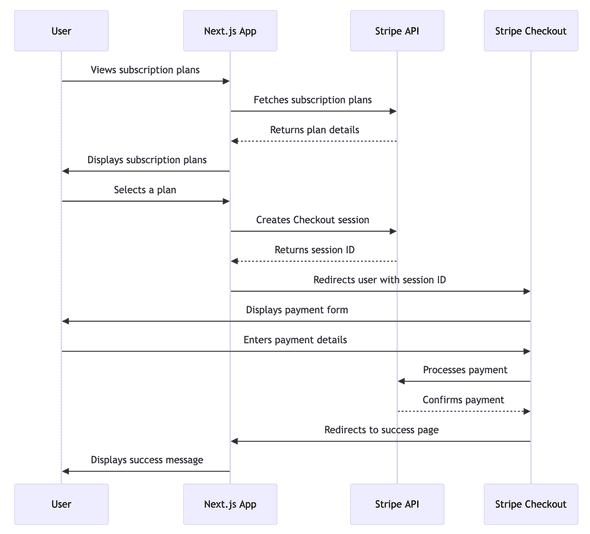
This diagram provides a clear visual representation of how the different components interact during the subscription sign-up process.
4.1 Creating a Subscription Page
First, let’s create a page where users can view and select subscription plans. Create a new file app/subscriptions/page.js:
'use client';

import { useState, useEffect } from 'react';
import { loadStripe } from '@stripe/stripe-js';

const stripePromise = loadStripe(process.env.NEXT_PUBLIC_STRIPE_PUBLISHABLE_KEY);

export default function Subscriptions() {
  const [plans, setPlans] = useState([]);

  useEffect(() => {
    // Fetch subscription plans from your API
    fetch('/api/subscription-plans')
      .then(res => res.json())
      .then(data => setPlans(data));
  }, []);

  const handleSubscribe = async (priceId) => {
    const stripe = await stripePromise;
    const { sessionId } = await fetch('/api/create-checkout-session', {
      method: 'POST',
      headers: {
        'Content-Type': 'application/json',
      },
      body: JSON.stringify({ priceId }),
    }).then(res => res.json());

    const result = await stripe.redirectToCheckout({ sessionId });

    if (result.error) {
      console.error(result.error);
    }
  };

  return (
    <div>
      <h1>Choose a Subscription Plan</h1>
      {plans.map(plan => (
        <div key={plan.id}>
          <h2>{plan.name}</h2>
          <p>{plan.description}</p>
          <p>Price: ${plan.price / 100} / {plan.interval}</p>
          <button onClick={() => handleSubscribe(plan.price_id)}>Subscribe</button>
        </div>
      ))}
    </div>
  );
}
This code creates a subscription page that fetches available plans from our API and displays them to the user. When a user clicks the “Subscribe” button, it initiates the Stripe Checkout process for the selected plan.
TODO: This still doesn’t work as we don’t have the API yet, let’s add it!
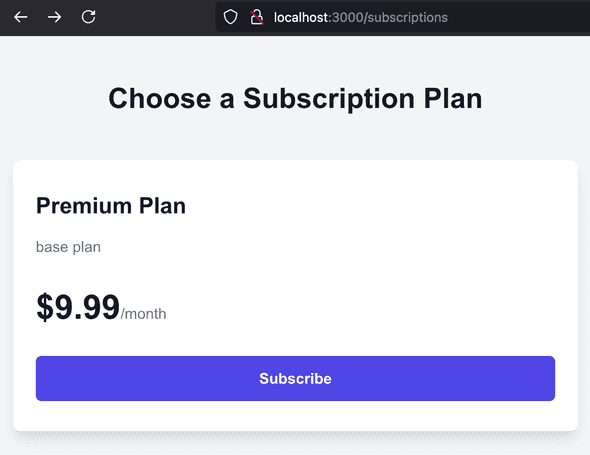
Here’s a visual representation of what this page might look like:
4.2 Fetching Subscription Plans
Create an API route to fetch subscription plans from Stripe. Create a new file app/api/subscription-plans/route.js:
import { NextResponse } from 'next/server';
import Stripe from 'stripe';

const stripe = new Stripe(process.env.STRIPE_SECRET_KEY);

export async function GET() {
  try {
    const prices = await stripe.prices.list({
      expand: ['data.product'],
      active: true,
      type: 'recurring',
    });

    const plans = prices.data.map(price => ({
      id: price.id,
      name: price.product.name,
      description: price.product.description,
      price: price.unit_amount,
      interval: price.recurring.interval,
      price_id: price.id,
    }));

    return NextResponse.json(plans);
  } catch (error) {
    console.error(error);
    return NextResponse.json({ error: 'Error fetching subscription plans' }, { status: 500 });
  }
}
This API route fetches all active recurring prices from Stripe, along with their associated product details. It then formats this data into a more convenient structure for our frontend to consume.
4.3 Creating a Checkout Session for Subscriptions
Now, let’s modify our existing create-checkout-session API route to handle subscription checkouts. Update app/api/create-checkout-session/route.js:
import { NextResponse } from 'next/server';
import Stripe from 'stripe';

const stripe = new Stripe(process.env.STRIPE_SECRET_KEY);

export async function POST(request) {
  const { priceId } = await request.json();

  try {
    const session = await stripe.checkout.sessions.create({
      mode: 'subscription',
      payment_method_types: ['card'],
      line_items: [
        {
          price: priceId,
          quantity: 1,
        },
      ],
      success_url: `${request.headers.get('origin')}/success?session_id={CHECKOUT_SESSION_ID}`,
      cancel_url: `${request.headers.get('origin')}/subscriptions`,
    });

    return NextResponse.json({ sessionId: session.id });
  } catch (error) {
    console.error(error);
    return NextResponse.json({ error: 'Error creating checkout session' }, { status: 500 });
  }
}
This API route creates a Stripe Checkout session for subscriptions. When a user selects a plan and clicks “Subscribe”, this route is called with the selected price ID. It then creates a Checkout session and returns the session ID, which is used to redirect the user to the Stripe Checkout page.
4.4 Handling Successful Subscriptions
After a user completes the Stripe Checkout process, they are redirected to a success page with a session_id parameter. We can use this to verify the subscription status immediately. Let’s implement this page and the necessary API route to verify the session.
First, create a new file app/success/page.js:
'use client';

import { useEffect, useState } from 'react';
import { useSearchParams } from 'next/navigation';

export default function SuccessPage() {
  const [status, setStatus] = useState('loading');
  const [customerEmail, setCustomerEmail] = useState('');
  const searchParams = useSearchParams();
  const sessionId = searchParams.get('session_id');

  useEffect(() => {
    if (sessionId) {
      fetchSessionStatus();
    }
  }, [sessionId]);

  async function fetchSessionStatus() {
    const response = await fetch('/api/check-session', {
      method: 'POST',
      headers: {
        'Content-Type': 'application/json',
      },
      body: JSON.stringify({ sessionId }),
    });

    const { session, error } = await response.json();

    if (error) {
      setStatus('failed');
      console.error(error);
      return;
    }

    setStatus(session.status);
    setCustomerEmail(session.customer_email);
  }

  if (status === 'loading') {
    return <div>Loading...</div>;
  }

  if (status === 'failed') {
    return <div>Failed to process subscription. Please try again.</div>;
  }

  return (
    <div>
      <h1>Subscription Successful!</h1>
      <p>Thank you for your subscription. A confirmation email has been sent to {customerEmail}.</p>
    </div>
  );
}
Next, create an API route to check the session status. Create a new file app/api/check-session/route.js:
import { NextResponse } from 'next/server';
import Stripe from 'stripe';

const stripe = new Stripe(process.env.STRIPE_SECRET_KEY);

export async function POST(request) {
  const { sessionId } = await request.json();

  try {
    const session = await stripe.checkout.sessions.retrieve(sessionId);

    console.log(session)
    if (session.payment_status === 'paid') {
      // Update your database to mark the user as subscribed
      // await updateUserSubscriptionStatus(session.client_reference_id, 'active');
    }

    return NextResponse.json({ session });
  } catch (error) {
    return NextResponse.json({ error: error.message }, { status: 400 });
  }
}
This setup allows you to verify the subscription status on the server-side and display a confirmation message to the user. The success page fetches the session details from Stripe (via your API route) to confirm the subscription status and retrieve the customer’s email address.
ℹ️ Note: While we can verify the subscription status immediately on the success page, it’s still important to implement webhook handlers for ongoing subscription management. Webhooks are crucial for handling events like subscription updates, cancellations, or payment failures that occur after the initial subscription process.
Remember that the path to the success page is set from create-checkout-session API route:
// In app/api/create-checkout-session/route.js
const session = await stripe.checkout.sessions.create({
  // ... other options ...
  success_url: `${request.headers.get('origin')}/success?session_id={CHECKOUT_SESSION_ID}`,
  // ... rest of the code ...
});
By implementing this success page, you provide immediate feedback to users about their subscription status, enhancing the overall user experience of your subscription flow.
5. Managing Subscriptions
Once users have subscribed, they’ll need a way to manage their subscriptions. We’ll use Stripe’s Customer Portal for this purpose, which provides a pre-built interface for users to manage their subscriptions, update payment methods, and view billing history.
5.1 Setting Up the Customer Portal in Stripe
Before we can use the Customer Portal, we need to configure it in the Stripe Dashboard. Follow these steps:
- Go to the Stripe Dashboard (https://dashboard.stripe.com/test/settings/billing/portal)
- Click on “Settings” in the top right menu.
- Select “Billing” then “More” in the tab menu, and select “Customer Portal”.
- Configure the settings according to your needs:
- Select which actions customers can take (e.g., cancel subscriptions, update payment methods)
- Choose which products customers can switch between
- Set up branding options
- Click “Save” at the bottom of the page
ℹ️ Note: Make sure you’re in test mode when setting this up for development. You’ll need to configure these settings separately for your live mode when you’re ready to launch.
5.2 Creating a Customer Portal Session
First, create an API route to generate a Stripe Customer Portal session. Create a new file app/api/create-portal-session/route.js:
import { NextResponse } from 'next/server';
import Stripe from 'stripe';

const stripe = new Stripe(process.env.STRIPE_SECRET_KEY);

export async function POST(request) {
  try {
    // Get the customer ID from your database based on the authenticated user
    const customerId = 'cus_example123'; // Replace with actual customer ID retrieval logic

    const session = await stripe.billingPortal.sessions.create({
      customer: customerId,
      return_url: `${request.headers.get('origin')}/account`,
    });

    return NextResponse.json({ url: session.url });
  } catch (error) {
    console.error(error);
    return NextResponse.json({ error: 'Error creating portal session' }, { status: 500 });
  }
}
This API route creates a session for the Stripe Customer Portal. You’ll need to replace the placeholder customerId with logic to retrieve the actual Stripe customer ID for the authenticated user from your database.
5.3 Adding a Manage Subscription Button
Now, let’s add a button to your account page that redirects users to the Stripe Customer Portal. Update or create app/account/page.js:
'use client';

import { useState } from 'react';

export default function Account() {
  const [isLoading, setIsLoading] = useState(false);

  const handleManageSubscription = async () => {
    setIsLoading(true);
    try {
      const response = await fetch('/api/create-portal-session', {
        method: 'POST',
      });
      const { url } = await response.json();
      window.location.href = url;
    } catch (error) {
      console.error(error);
    } finally {
      setIsLoading(false);
    }
  };

  return (
    <div>
      <h1>Account</h1>
      <button onClick={handleManageSubscription} disabled={isLoading}>
        {isLoading ? 'Loading...' : 'Manage Subscription'}
      </button>
    </div>
  );
}
This code adds a “Manage Subscription” button to the account page. When clicked, it creates a Customer Portal session and redirects the user to the Stripe-hosted portal.
This is a demo of the UI navigating to the Customer Portal, I’ve hard-coded the customer ID, but in a real implementation you’d get that from the database.
5.4 Considerations and Limitations
While the Stripe Customer Portal provides a convenient out-of-the-box solution for subscription management, it has some limitations to keep in mind:
-
Subscription Changes Timing: By default, when users upgrade or downgrade their subscription through the portal, the changes take effect at the end of the current billing cycle. If you need more immediate changes, you may need to implement custom logic.
-
Customization: The Customer Portal offers limited customization options. If you need a highly customized interface, you might need to build your own subscription management UI.
-
Feature Set: The portal includes a set of predefined features. If you need very specific or unique subscription management features, you might need to extend the functionality with your own implementation.
-
Testing: Remember that you need to set up the Customer Portal separately in both test and live modes in your Stripe Dashboard.
In a future article, we’ll explore how to build a custom subscription management interface in Next.js, which will give you more control over the upgrade/downgrade process and allow for immediate changes to subscription status.
By following these steps and considerations, you should now have a functioning Customer Portal integration that allows your users to manage their subscriptions directly through Stripe’s interface.
6. Handling Subscription Lifecycle Events with Webhooks
To keep your application in sync with subscription changes made through the Stripe Customer Portal, you’ll need to handle webhook events. We’ll focus on three key events: customer.subscription.updated, customer.subscription.deleted, and invoice.payment_succeeded.
💡 Note: For an in-depth guide on handling complex webhook scenarios and avoiding race conditions in credit management, check out our article on Solving Stripe Webhook Race Conditions.
6.1 Updating the Webhook Handler
In Part 1, we covered the basics of setting up a webhook endpoint to handle Stripe events. For subscriptions, we’ll build upon that knowledge to handle subscription-specific events. If you need a refresher on webhook basics, refer back to the webhook section in Part 1 of this series.
Update your existing webhook handler (app/api/webhooks/stripe/route.js) to include these new events:
import { NextResponse } from 'next/server';
import Stripe from 'stripe';

const stripe = new Stripe(process.env.STRIPE_SECRET_KEY);
const endpointSecret = process.env.STRIPE_WEBHOOK_SECRET;

export async function POST(request) {
  const body = await request.text();
  const sig = request.headers.get('stripe-signature');
  let event;

  try {
    event = stripe.webhooks.constructEvent(body, sig, endpointSecret);
  } catch (err) {
    console.error('Error verifying webhook signature:', err);
    return NextResponse.json({ error: `Webhook Error: ${err.message}` }, { status: 400 });
  }

  // Handle the event
  switch (event.type) {
    case 'customer.subscription.updated':
      await handleSubscriptionUpdated(event.data.object);
      break;
    case 'customer.subscription.deleted':
      await handleSubscriptionDeleted(event.data.object);
      break;
    case 'invoice.payment_succeeded':
      await handleInvoicePaid(event.data.object);
      break;
    // ... handle other events
    default:
      console.log(`Unhandled event type: ${event.type}`);
  }

  return NextResponse.json({ received: true });
}

async function handleSubscriptionUpdated(subscription) {
  // Update the subscription status in your database
  // You might want to update the user's access level based on the new subscription status
  console.log('Subscription updated:', subscription.id);
}

async function handleSubscriptionDeleted(subscription) {
  // Update the subscription status in your database
  // You might want to revoke the user's access to premium features
  console.log('Subscription deleted:', subscription.id);
}

async function handleInvoicePaid(invoice) {
  // Update the user's payment status in your database
  // You might want to extend the user's access period
  console.log('Invoice paid:', invoice.id);
}

export const config = {
  api: {
    bodyParser: false,
  },
};
These webhook handlers allow you to keep your database and application state in sync with changes made to subscriptions through the Stripe Customer Portal or other means. Here’s a brief explanation of each handler:
handleSubscriptionUpdated: This function is called when a subscription is updated. You might use this to update the user’s access level or subscription status in your database.handleSubscriptionDeleted: This function is called when a subscription is cancelled. You might use this to revoke the user’s access to premium features.handleInvoicePaid: This function is called when an invoice is successfully paid. You might use this to extend the user’s access period or update their payment status.
Remember to replace the console.log statements with actual database operations in a production environment.
7. Conclusion
In this tutorial, we’ve covered the essential steps to implement subscription-based services in a Next.js application using Stripe. We’ve learned how to:
- Set up subscription products in Stripe
- Create a subscription sign-up flow in Next.js
- Implement subscription management using the Stripe Customer Portal
- Handle subscription lifecycle events with webhooks
This implementation provides a solid foundation for building subscription-based services. However, remember that a production-ready system would require additional features such as:
- User authentication and authorization
- Secure storage of customer IDs and subscription statuses
- Error handling and user feedback
- Testing and monitoring
As you continue to develop your subscription-based service, consider these aspects to create a robust and user-friendly experience.
8. Next Steps
While this tutorial has given you a strong start in implementing subscription-based services, there are several areas you might want to explore further:
-
Custom Subscription Management: In a future article, we’ll dive into building a custom subscription management interface in Next.js. This will give you more control over the upgrade/downgrade process and allow for immediate changes to subscription status.
-
Handling Failed Payments: Implement logic to handle failed payments and communicate with users about payment issues.
-
Subscription Analytics: Develop a dashboard to track key metrics like Monthly Recurring Revenue (MRR), churn rate, and customer lifetime value.
-
Tiered Access: Implement a system to provide different levels of access or features based on the user’s subscription tier.
-
Subscription Emails: Set up an email system to send welcome emails, payment receipts, and subscription expiration notices.
-
Testing: Develop a comprehensive testing strategy, including unit tests for your API routes and integration tests for the subscription flow.
By continuing to refine and expand your subscription system, you’ll be able to create a powerful, flexible platform that can grow with your business needs.
Remember, building a subscription-based service is an iterative process. Start with the basics outlined in this tutorial, and gradually add more advanced features as your needs evolve. Happy coding!