In this blog post, we’ll explore how to create a shopping cart component using React and local storage. We’ll cover the following topics:
- Setting up the shopping cart context and provider
- Creating custom hooks for managing the cart state
- Integrating local storage to persist cart data
- Building the cart overlay component
- Handling cart item management (adding, removing, updating quantities)
By the end of this post, you’ll have a solid understanding of how to implement a shopping cart in your React applications using context, hooks, and local storage. Let’s dive in.
1. Shopping Cart Context and Provider
In React, the Context API is a way to share data between components without having to pass the data through every level of the component tree. It’s like a global store that any component can access directly.
In our shopping cart implementation, we’ll be using two separate contexts to manage different aspects of the cart functionality:
ShoppingCartContext: This context will store the actual cart data, such as the cart items, and provide functions to add, remove, update, and clear items from the cart.CartOverlayContext: This context will manage the visibility of the cart overlay, which opens from the side on any page of the store.
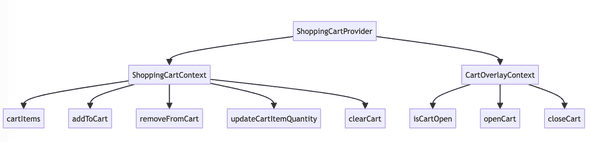
The following diagram illustrates the component hierarchy and the flow of data between the ShoppingCartProvider, ShoppingCartContext, and CartOverlayContext:
Let’s start by creating the CartOverlayContext:
import { createContext, useContext } from "react";
import { noop } from "@/helpers/utils";

export const useCartOverlay = () => useContext(CartOverlayContext);

const CartOverlayContext = createContext({
  isCartOpen: false,
  openCart: noop,
  closeCart: noop,
});

export default CartOverlayContext;
The CartOverlayContext provides the following:
isCartOpen: A boolean value indicating whether the cart overlay is currently open or closed.openCart: A function to open the cart overlay.closeCart: A function to close the cart overlay.
Next, let’s create the ShoppingCartContext:
import { createContext } from "react";
import { Product, Variant } from "@/types/ui_types";
import { noop } from "@/helpers/utils";

export type CartItem = {
  product: Product;
  quantity: number;
  variant: Variant | null;
};

type ShoppingCartContextType = {
  cartItems: CartItem[];
  addToCart: (
    product: Product,
    quantity: number,
    variant: Variant | null,
  ) => void;
  removeFromCart: (productId: string, variantId: string | null) => void;
  updateCartItemQuantity: (
    productId: string,
    variantId: string | null,
    quantity: number,
  ) => void;
  clearCart: () => void;
};

const ShoppingCartContext = createContext<ShoppingCartContextType>({
  cartItems: [],
  addToCart: noop,
  removeFromCart: noop,
  updateCartItemQuantity: noop,
  clearCart: noop,
});

export default ShoppingCartContext;
The ShoppingCartContext defines the following:
cartItems: An array of CartItem objects representing the items in the cart.addToCart: A function to add a product to the cart or increase its quantity if it already exists.removeFromCart: A function to remove a product from the cart based on its ID and variant ID.updateCartItemQuantity: A function to update the quantity of a cart item based on its product ID and variant ID.clearCart: A function to clear all items from the cart.
To make the context available to the components, we need a provider. The provider is a special component that wraps the components that need access to the context. It’s like a delivery service that brings the context data to the components.
We create a provider component called ShoppingCartProvider:
import React, { useEffect, useState } from "react";
import { Product, Variant } from "@/types/ui_types";
import ShoppingCartContext from "./shoppingCartContext";
import CartOverlayContext from "./cartOverlayContext";

const ShoppingCartProvider: React.FC<Props> = ({ children, storeKey }) => {
  const [cartItems, setCartItems] = useState<CartItem[]>([]);
  const [cartLoaded, setCartLoaded] = useState(false);
  const [isCartOpen, setIsCartOpen] = useState(false);
  const [isClearCartRequested, setIsClearCartRequested] = useState(false);

  // Cart management functions

  const addToCart = (
    product: Product,
    quantity: number,
    variant: Variant | null,
  ) => {
    setCartItems((prevCartItems) => {
      const existingItem = prevCartItems.find(
        (item) =>
          item.product.id === product.id && item.variant?.id === variant?.id,
      );

      if (existingItem) {
        return prevCartItems.map((item) =>
          item.product.id === product.id && item.variant?.id === variant?.id
            ? { ...item, quantity: item.quantity + quantity }
            : item,
        );
      } else {
        return [...prevCartItems, { product, quantity, variant }];
      }
    });

    openCart(); // Cart Overlay
  };

  const removeFromCart = (productId: string, variantId: string | null) => {
    setCartItems(
      cartItems.filter(
        (item) =>
          item.product.id !== productId || item.variant?.id !== variantId,
      ),
    );
  };

  const updateCartItemQuantity = (
    productId: string,
    variantId: string | null,
    quantity: number,
  ) => {
    const existingCartItemIndex = cartItems.findIndex(
      (item) => item.product.id === productId && item.variant?.id === variantId,
    );

    if (existingCartItemIndex >= 0) {
      const updatedCartItems = [...cartItems];
      updatedCartItems[existingCartItemIndex].quantity = quantity;
      setCartItems(updatedCartItems);
    }
  };

  const clearCart = () => {
    setIsClearCartRequested(true);
  };

  const openCart = () => {
    setIsCartOpen(true);
  };

  const closeCart = () => {
    setIsCartOpen(false);
  };

  // Provide context values

  const cartOverlayContextValue = {
    isCartOpen,
    openCart,
    closeCart,
  };

  const shoppingCartContextValue: ShoppingCartContextType = {
    cartItems,
    addToCart,
    removeFromCart,
    updateCartItemQuantity,
    clearCart,
  };

  return (
    <ShoppingCartContext.Provider value={shoppingCartContextValue}>
      <CartOverlayContext.Provider value={cartOverlayContextValue}>
        {children}
      </CartOverlayContext.Provider>
    </ShoppingCartContext.Provider>
  );
};

export default ShoppingCartProvider;
The ShoppingCartProvider manages the state for both the cart items (cartItems) and the cart overlay visibility (isCartOpen). It provides the context values to the child components using the ShoppingCartContext.Provider and CartOverlayContext.Provider.
2. Custom Hooks for Managing Cart State
To make it easier for components to access the cart state and functions, we can create custom hooks. Let’s create two custom hooks: one for managing the cart overlay and another for managing the cart items.
import { useContext } from "react";
import ShoppingCartContext from "./shoppingCartContext";
import CartOverlayContext from "./cartOverlayContext";

export const useCartOverlay = () => useContext(CartOverlayContext);
export const useCart = () => useContext(ShoppingCartContext);
The useCartOverlay hook allows components to access the CartOverlayContext, which provides the isCartOpen state and the openCart and closeCart functions.
The useCart hook allows components to access the ShoppingCartContext, which provides the cartItems state and the cart management functions (addToCart, removeFromCart, updateCartItemQuantity, clearCart).
By using these custom hooks, components can easily interact with the cart state and functionality without the need for prop drilling.
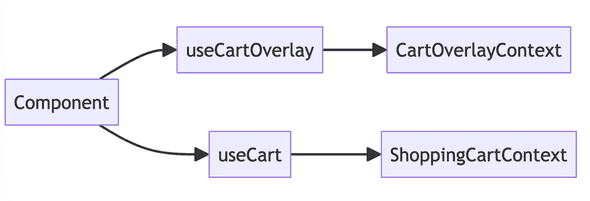
The following diagram shows how the custom hooks (useCartOverlay and useCart) interact with the context and the components that use them:
For example, to open the cart overlay when a new item is added to the cart, you can use the useCartOverlay hook in the addToCart function:
const addToCart = (
  product: Product,
  quantity: number,
  variant: Variant | null,
) => {
  // Add the item to the cart
  setCartItems((prevCartItems) => {
    // ...
  });

  // Open the cart overlay
  openCart();
};
And in the component that renders the cart overlay, you can use the useCartOverlay hook to conditionally render the overlay based on the isCartOpen state:
const CartOverlay: React.FC = () => {
  const { isCartOpen, closeCart } = useCartOverlay();

  if (!isCartOpen) {
    return null;
  }

  return (
    // Render the cart overlay
  );
};
By separating the concerns of cart data management and cart overlay visibility into two separate contexts and providing custom hooks to access them, we achieve a more modular and maintainable architecture for our shopping cart implementation.
In the next section, we can explore how to integrate local storage to persist the cart data across page refreshes and sessions.
3. Integrating Local Storage to Persist Cart Data
Local storage is a web storage mechanism that allows websites to store key-value pairs in the user’s browser. It provides a way to persist data even after the user closes the browser or navigates away from the website. By storing the cart data in local storage, we can ensure that the user’s cart items are preserved across sessions, providing a seamless shopping experience.
To integrate local storage with our shopping cart provider, we can use the useEffect hook to retrieve cart data from local storage when the component mounts and update local storage whenever the cart data changes.
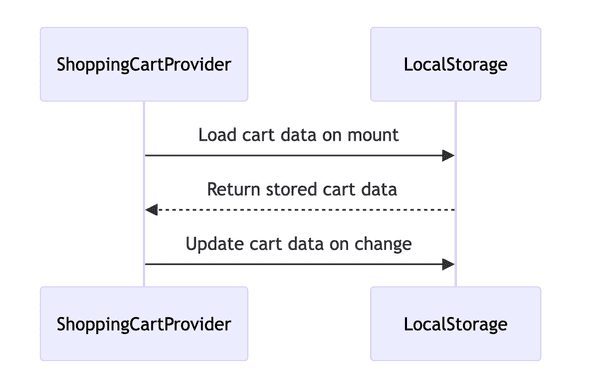
The following diagram demonstrates how the cart data is stored in local storage and retrieved when the component mounts:
Here’s an example of how to implement local storage extending the ShoppingCartProvider component:
const ShoppingCartProvider: React.FC<Props> = ({ children, storeKey }) => {
  // other state properties
  const [cartItems, setCartItems] = useState<CartItem[]>([]);


  // Add to the shopping cart provider to support local storage save and load

  // Load cart data from local storage on component mount
  useEffect(() => {
    const storedCartItems = localStorage.getItem(`cart_${storeKey}`);
    if (storedCartItems) {
      setCartItems(JSON.parse(storedCartItems));
    }
  }, [storeKey]);

  // Update local storage when cart items change
  useEffect(() => {
    localStorage.setItem(`cart_${storeKey}`, JSON.stringify(cartItems));
  }, [cartItems, storeKey]);

  // Cart management functions (addToCart, removeFromCart, updateCartItemQuantity, clearCart)
  // functions defined above
}
In the first useEffect hook, we retrieve the cart data from local storage when the component mounts. We use the storeKey prop to create a unique key for storing the cart data, allowing multiple instances of the shopping cart to exist independently. If there are stored cart items, we parse the JSON data and set it as the initial state of cartItems.
In the second useEffect hook, we update the local storage whenever the cartItems state changes. We stringify the cartItems array and store it in local storage using the storeKey. This ensures that the cart data persists across page refreshes and navigation.
By wrapping the local storage functionality within the ShoppingCartProvider component, we encapsulate the cart data persistence logic and provide a seamless integration with the rest of the shopping cart functionality.
It’s important to note that local storage is not just beneficial for desktop websites but also for mobile web applications. On mobile devices, local storage works similarly, allowing users to persist their cart data across sessions and providing a consistent shopping experience even if they switch between different pages or close the browser.
With local storage integration, our shopping cart becomes more robust and user-friendly, offering a personalized experience to users across different sessions.
4. Building the Cart Overlay Component
Now let’s build the cart overlay component that will display the cart items and allow users to manage their cart. We’ll create a single CartOverlay component that combines the functionality of the header, footer, and cart items display.
import React, { useEffect } from "react";
import Image from "next/image";
import { useCart } from "@/hooks/shoppingCartProvider";
type Props = {
isCartOpen: boolean;
closeCart: () => void;
};
const CartOverlay: React.FC<Props> = ({ isCartOpen, closeCart }) => {
const { cartItems, removeFromCart, updateCartItemQuantity } = useCart();
const handleRemoveFromCart = (productId: string, variantId: string | null) => {
removeFromCart(productId, variantId);
};
const handleDecreaseQuantity = (item: CartItem) => {
if (item.quantity > 1) {
updateCartItemQuantity(
item.product.id,
item.variant?.id ?? null,
item.quantity - 1,
);
}
};
const handleIncreaseQuantity = (item: CartItem) => {
updateCartItemQuantity(
item.product.id,
item.variant?.id ?? null,
item.quantity + 1,
);
};
const subtotal = cartItems
.reduce((total, item) => total + item.product.price * item.quantity, 0)
.toFixed(2);
useEffect(() => {
if (isCartOpen) {
document.body.style.overflow = "hidden";
} else {
document.body.style.overflow = "auto";
}
return () => {
document.body.style.overflow = "auto";
};
}, [isCartOpen]);
return (
<div
className={`fixed inset-0 z-50 overflow-hidden ${
isCartOpen ? "pointer-events-auto" : "pointer-events-none"
}`}
>
<div
className={`absolute inset-0 bg-black bg-opacity-50 transition-opacity ${
isCartOpen ? "opacity-100" : "opacity-0"
}`}
onClick={() => closeCart()}
/>
<div
className={`absolute inset-y-0 right-0 max-w-full flex transform transition-transform duration-300 ${
isCartOpen ? "translate-x-0" : "translate-x-full"
}`}
>
<div className="w-screen max-w-md">
<div className="h-full flex flex-col bg-white shadow-xl">
{/* Cart Overlay Header */}
<div className="flex justify-between items-center px-4 py-3 border-b">
<h2 className="text-lg font-semibold">Shopping Cart</h2>
<button
onClick={closeCart}
className="text-gray-500 hover:text-gray-600"
>
<span className="sr-only">Close cart</span>
<svg className="h-6 w-6" fill="none" viewBox="0 0 24 24" stroke="currentColor">
<path strokeLinecap="round" strokeLinejoin="round" strokeWidth={2} d="M6 18L18 6M6 6l12 12" />
</svg>
</button>
</div>
{/* Cart Items */}
<div className="flex-1 overflow-y-auto">
{cartItems.length === 0 ? (
<div className="flex flex-col items-center justify-center h-full text-center">
<svg className="h-12 w-12 text-gray-400" fill="none" viewBox="0 0 24 24" stroke="currentColor">
<path strokeLinecap="round" strokeLinejoin="round" strokeWidth={2} d="M16 11V7a4 4 0 00-8 0v4M5 9h14l1 12H4L5 9z" />
</svg>
<h3 className="mt-2 text-sm font-medium text-gray-900">Your cart is empty</h3>
<p className="mt-1 text-sm text-gray-500">Add items to your cart to get started.</p>
</div>
) : (
<div className="px-4 divide-y divide-gray-200">
{cartItems.map((item) => (
<div key={`${item.product.id}-${item.variant?.id}`} className="py-4">
<div className="flex items-start">
<div className="flex-shrink-0">
<Image
src={item.variant?.image || item.product.images[0]}
alt={item.product.name}
className="w-16 h-16 rounded-md object-cover"
width={64}
height={64}
/>
</div>
<div className="ml-4">
<h3 className="text-sm font-medium text-gray-900">{item.product.name}</h3>
{item.variant && (
<p className="mt-1 text-sm text-gray-500">
{item.variant.color}
{item.variant.size && ` - ${item.variant.size}`}
</p>
)}
<p className="mt-1 text-sm font-medium text-gray-900">${item.product.price.toFixed(2)}</p>
</div>
</div>
<div className="mt-4 flex items-center">
<button
onClick={() => handleDecreaseQuantity(item)}
className="text-sm font-medium text-indigo-600 hover:text-indigo-500"
>
-
</button>
<span className="mx-2 text-sm text-gray-500">{item.quantity}</span>
<button
onClick={() => handleIncreaseQuantity(item)}
className="text-sm font-medium text-indigo-600 hover:text-indigo-500"
>
+
</button>
<button
onClick={() => handleRemoveFromCart(item.product.id, item.variant?.id ?? null)}
className="ml-4 text-sm font-medium text-red-600 hover:text-red-500"
>
Remove
</button>
</div>
</div>
))}
</div>
)}
</div>
{/* Cart Overlay Footer */}
{cartItems.length > 0 && (
<div className="px-4 py-6 border-t">
<div className="flex justify-between text-base font-medium text-gray-900">
<p>Subtotal</p>
<p>${subtotal}</p>
</div>
<p className="mt-0.5 text-sm text-gray-500">Shipping and taxes calculated at checkout.</p>
<div className="mt-6">
<button
className="w-full px-6 py-3 border border-transparent rounded-md shadow-sm text-base font-medium text-white bg-indigo-600 hover:bg-indigo-700"
>
Checkout
</button>
</div>
<div className="mt-6 flex justify-center text-sm text-center text-gray-500">
<p>
or{" "}
<button
type="button"
className="text-indigo-600 font-medium hover:text-indigo-500"
onClick={closeCart}
>
Continue Shopping<span aria-hidden="true"> →</span>
</button>
</p>
</div>
</div>
)}
</div>
</div>
</div>
</div>
);
};
export default CartOverlay;In the CartOverlay component, we use the useCart custom hook to access the cartItems, removeFromCart, and updateCartItemQuantity functions.
The following diagram illustrates the flow of adding an item to the cart from the ProductCard component using the addToCart function from the useCart hook:

The component renders the cart overlay content based on the isCartOpen prop, which determines whether the overlay is visible or not. It consists of three main sections: the header, the cart items, and the footer.
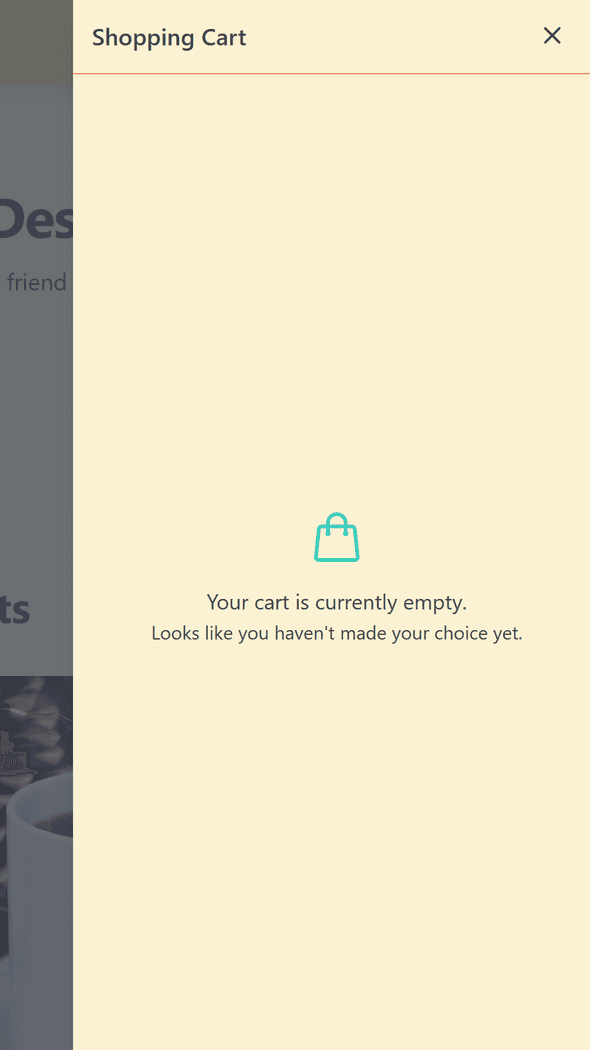
The header displays the title “Shopping Cart” and a close button to allow users to close the cart overlay.
The cart items section renders the list of items in the cart. If the cart is empty, it displays a message indicating that the cart is empty. Otherwise, it maps over the cartItems array and renders each item with its image, name, price, and quantity. Users can increase or decrease the quantity of each item using the ”+” and ”-” buttons, and they can remove an item from the cart using the “Remove” button.
The footer section displays the subtotal of the cart items and a “Checkout” button to proceed to the checkout process. It also provides a “Continue Shopping” button to allow users to close the cart overlay and continue browsing the website.
The component uses the useEffect hook to control the overflow style of the document.body based on the isCartOpen state. When the cart overlay is open, it sets overflow to "hidden" to prevent scrolling on the main content, and when the cart overlay is closed, it sets overflow back to "auto".
This simplified version of the CartOverlay component provides a comprehensive example of how to build a cart overlay with functionality for managing cart items, displaying the subtotal, and proceeding to checkout. You can customize the styling and layout to match your application’s design.
Here’s a visual representation of how the cart overlay would look like empty:
Here’s a visual representation of how the cart overlay would look like with a product:

The cart overlay displays the list of cart items, allowing users to manage quantities, remove items, and proceed to checkout. The header shows the title “Shopping Cart” and provides a close button, while the footer displays the subtotal and the “Checkout” and “Continue Shopping” buttons.
5. Handling Cart Item Management
In the previous section, we saw how the CartOverlay component handles the management of cart items using the removeFromCart and updateCartItemQuantity functions provided by the useCart custom hook.
Now, let’s see how we can add items to the cart from our website. Here’s an example of a ProductCard component that allows users to add products to the cart:
import React from "react";
import Image from "next/image";
import { useCart } from "@/hooks/shoppingCartProvider";

type Props = {
  product: Product;
};

const ProductCard: React.FC<Props> = ({ product }) => {
  const { addToCart } = useCart();

  const handleAddToCart = () => {
    addToCart(product, 1, null);
  };

  return (
    <div className="bg-white shadow-md rounded-lg p-4">
      <div className="relative pb-48 overflow-hidden">
        <Image
          src={product.images[0]}
          alt={product.name}
          className="absolute inset-0 h-full w-full object-cover"
          width={300}
          height={300}
        />
      </div>
      <div className="mt-4">
        <h3 className="text-lg font-medium text-gray-900">{product.name}</h3>
        <p className="mt-1 text-sm text-gray-500">${product.price.toFixed(2)}</p>
        <button
          onClick={handleAddToCart}
          className="mt-4 px-4 py-2 bg-indigo-600 text-white rounded-md hover:bg-indigo-700"
        >
          Add to Cart
        </button>
      </div>
    </div>
  );
};

export default ProductCard;
In the ProductCard component, we use the useCart custom hook to access the addToCart function. We define a handleAddToCart function that calls addToCart with the current product, a quantity of 1, and a variant value of null (assuming the product doesn’t have variants in this example).
The component renders the product image, name, price, and an “Add to Cart” button. When the user clicks the “Add to Cart” button, it triggers the handleAddToCart function, which adds the product to the cart using the addToCart function from the useCart hook.
Finally, to make the ShoppingCartProvider available to our entire application, we need to wrap our application with the provider in the _app.tsx file:
import { ShoppingCartProvider } from "@/hooks/shoppingCartProvider";

function MyApp({ Component, pageProps }) {
  return (
    <ShoppingCartProvider>
      <Component {...pageProps} />
    </ShoppingCartProvider>
  );
}

export default MyApp;
By wrapping our application with the ShoppingCartProvider, we ensure that all components have access to the cart state and functions provided by the context.
And there you have it! We’ve covered the main components and logic for creating a shopping cart using React and the Context API. By utilizing custom hooks and context, we can create a modular and efficient shopping cart component that can be easily integrated into any e-commerce application.
If you’re interested in enhancing your React application with user authentication, check out the related post on Authentication in Next.js 14 with NextAuth.js. It covers how to implement secure user authentication, which could be a valuable addition to your e-commerce site with a shopping cart.
I hope this blog post has been informative and helpful in understanding how to build a shopping cart with React. Feel free to explore the code further and adapt it to your specific needs.